Tag Management
ClariNet LS offers users the ability to tag cases or Insureds. Tags are labels that can be either built-in tags that ClearLife has defined or user defined tags.
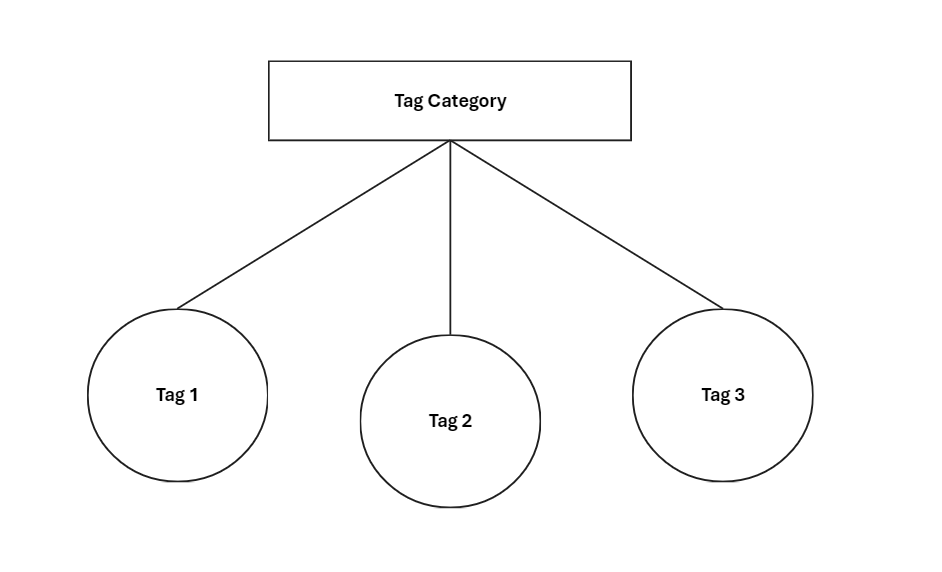
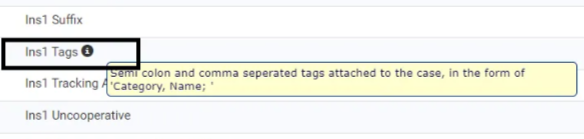
Tags enable you to mark one or more states for a Case or an Insured. A Case or Insured can be marked in multiple states simultaneously. Each Tag can be grouped within a Tag Category.
To access Tag Management
To access the page, click on Tag management under Settings menu.
Two operations allowed on this page are
- Add Tag
- Add Tag Category
These operations can be performed using the Actions button.
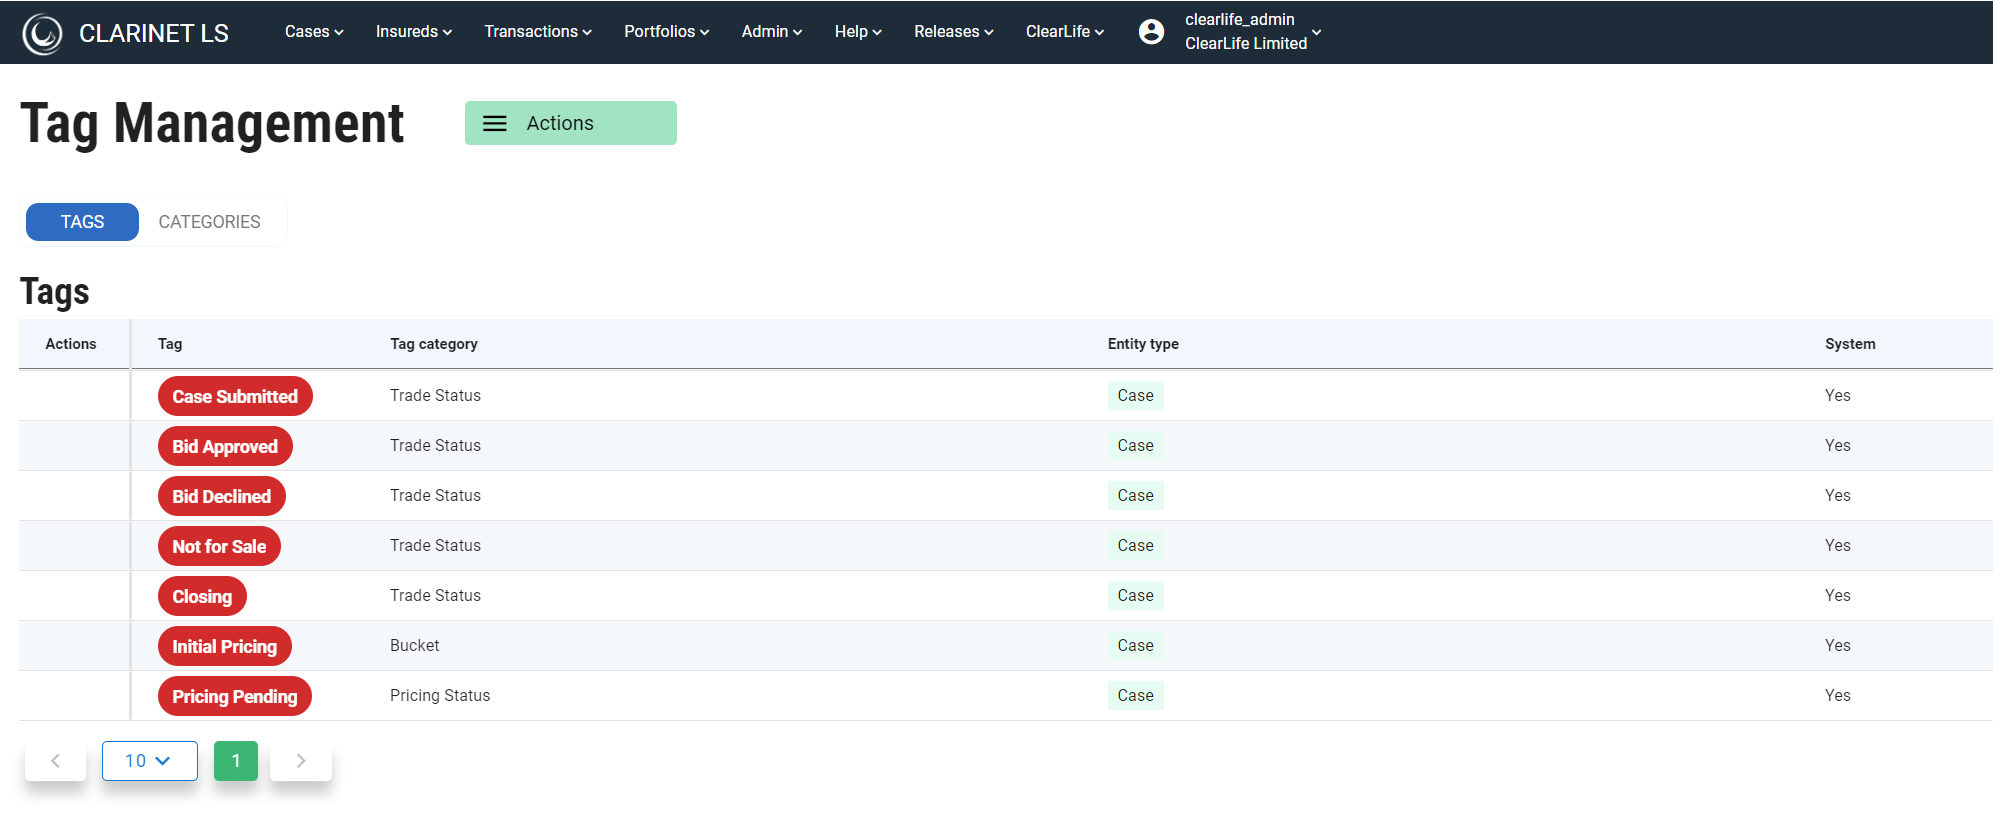
Built-in tags and categories cannot be deleted, only the user defined ones can be deleted.
Clicking on the Add Category link opens a sidebar with the details required to create a new category.
Tag category entity can be either Case or Insured.
The multiple tags checkbox allows multiple tags to be used for that category. If the checkbox is not checked, then only one tag from the category can be used at a time on a case or insured. Once a category is created, it will be listed under categories tab.
Clicking on the Add Tag link opens a sidebar with the details required to create a new tag. Tag category entity can be either Case or Insured. Tag entity updates according to tag category selection. Once a tag is created, it will be listed under Tags tab.
ClariNet offers a wide selection of colors for the tags.
Using tags
Adding a tag to a case
Select a case of your preference and click on EDIT. On the case page, you are provided with an option to add tags as shown below:
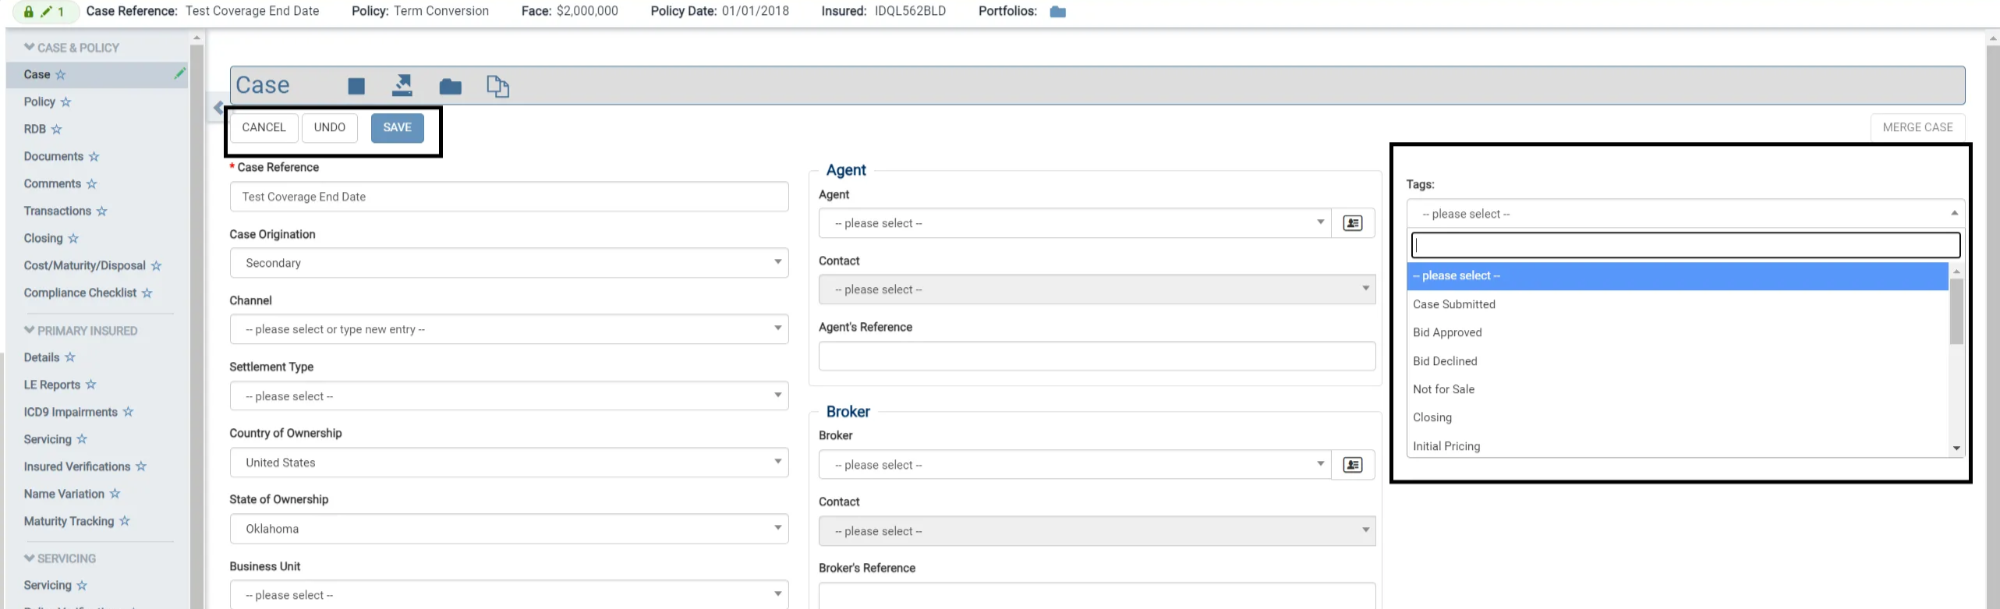
Select the required tags from the list and SAVE the page.
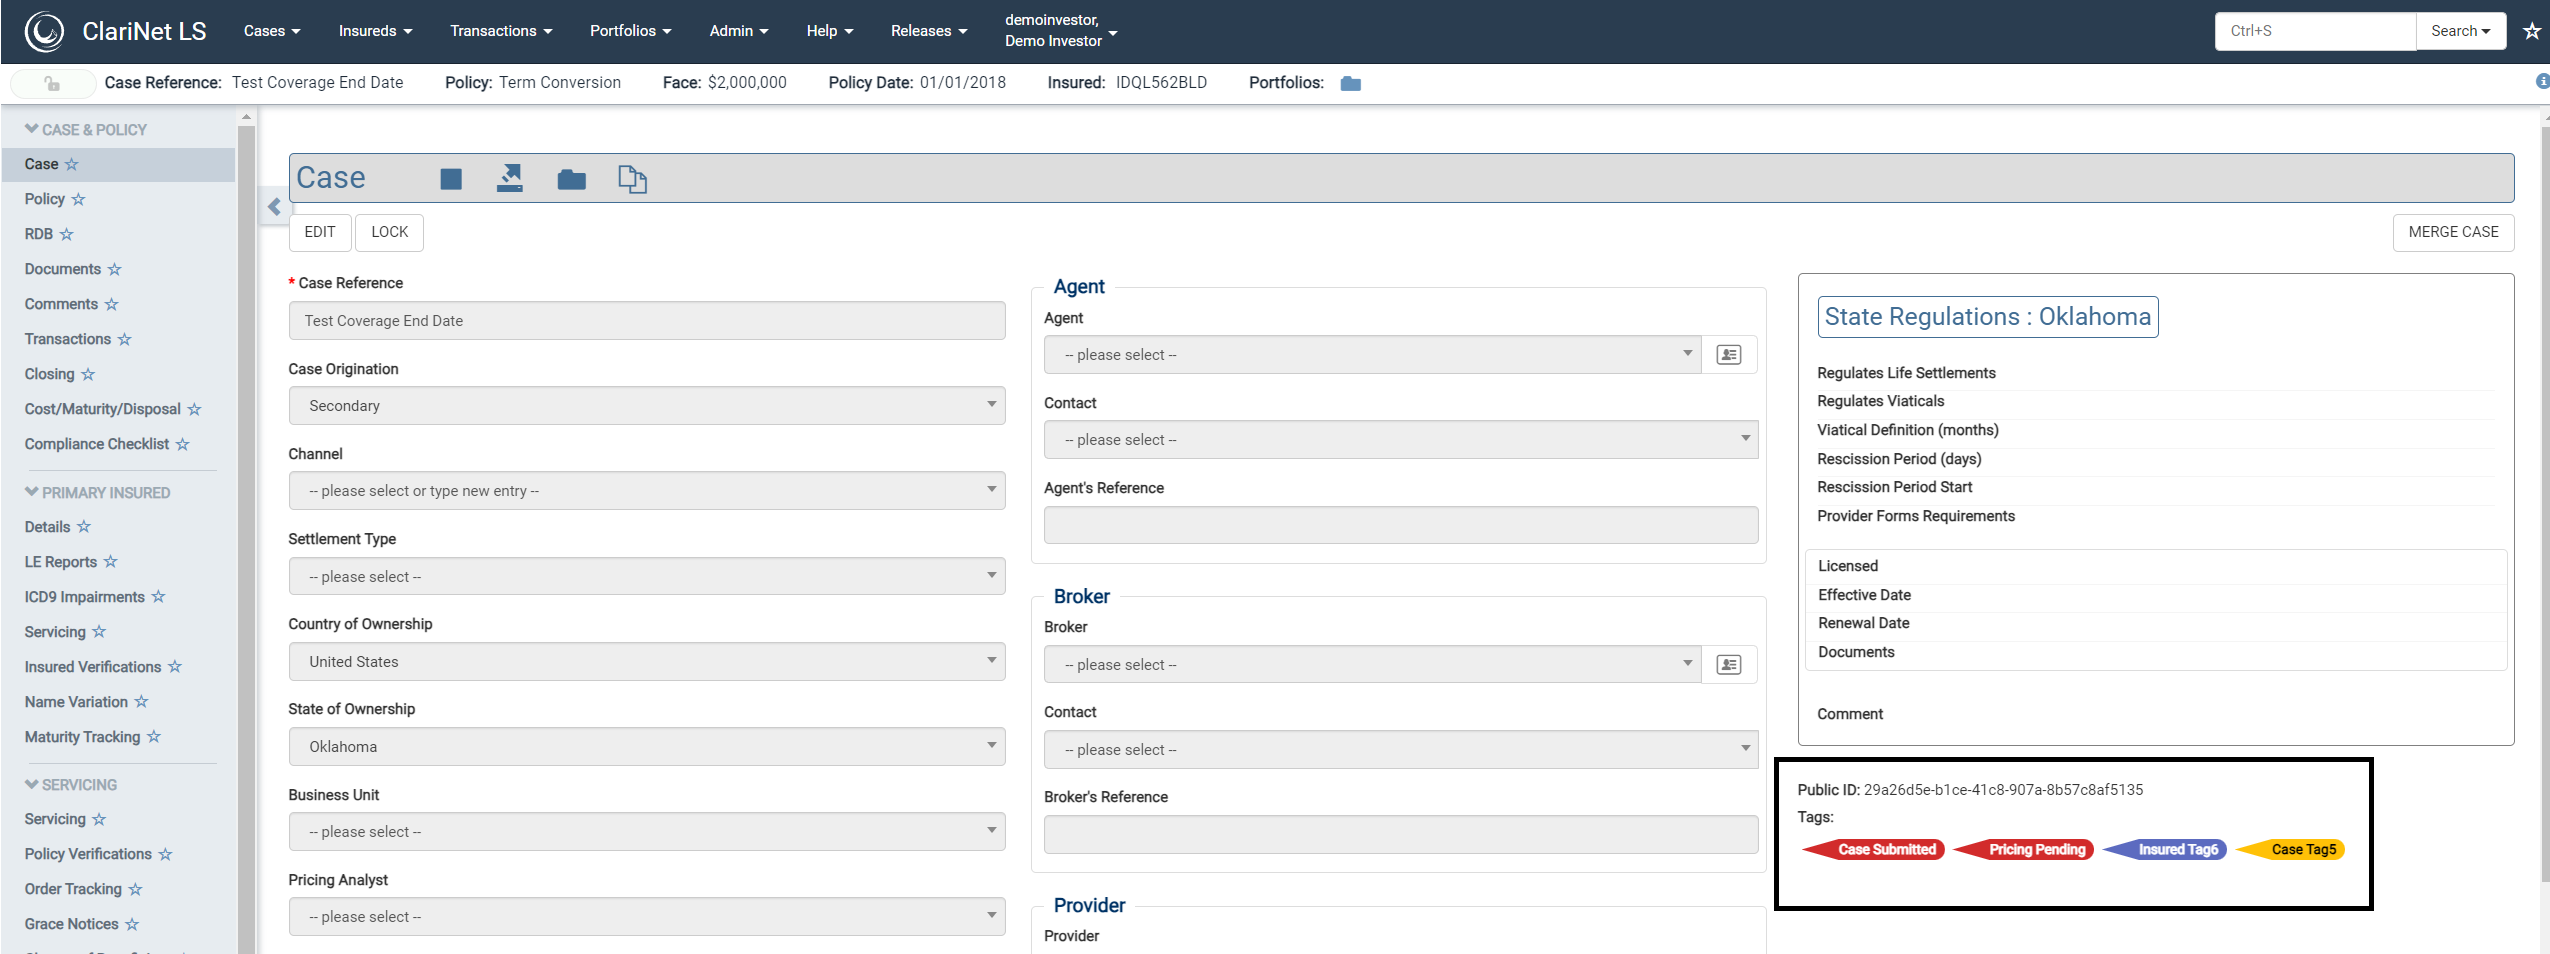
The case and insured pages must be in edit mode to add or remove tags.
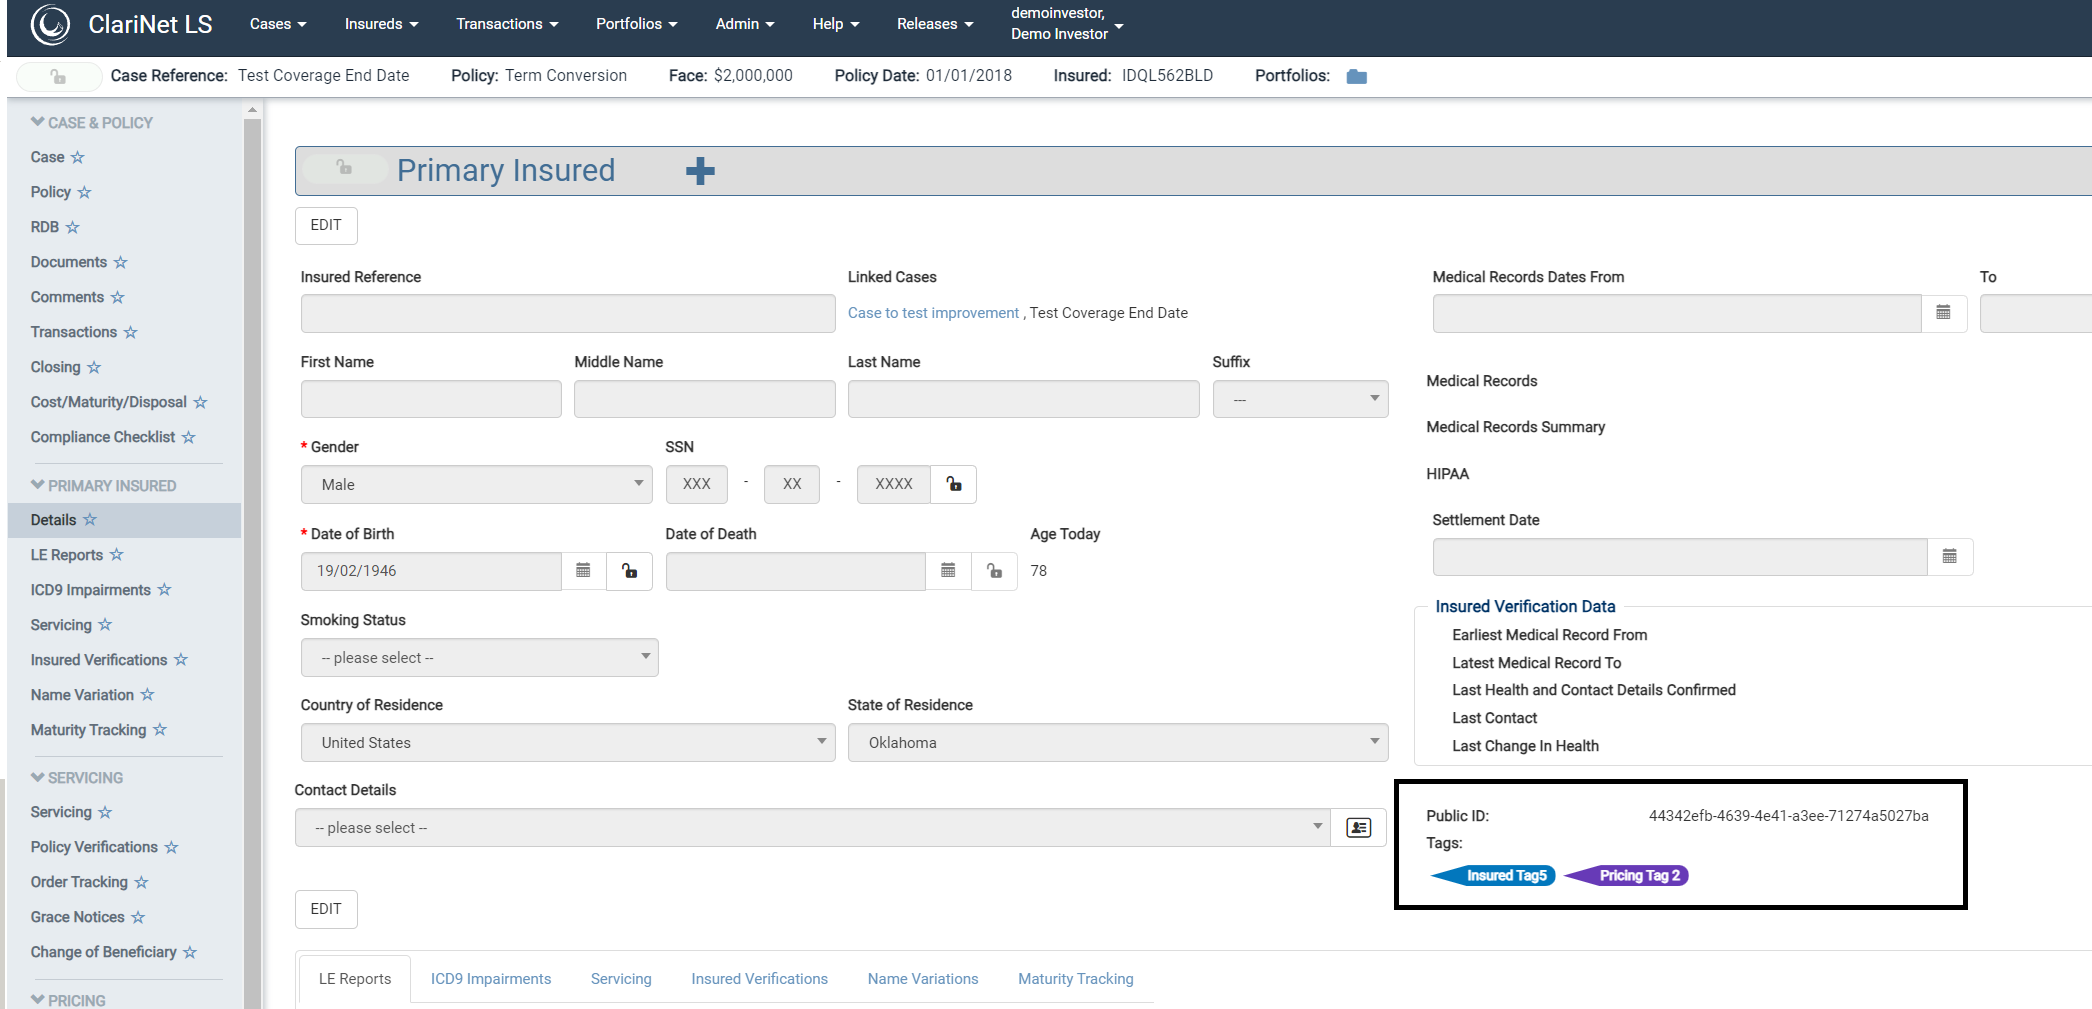
Adding a tag to an Insured
Similarly, on the Insured page, required tags can be added as shown below:
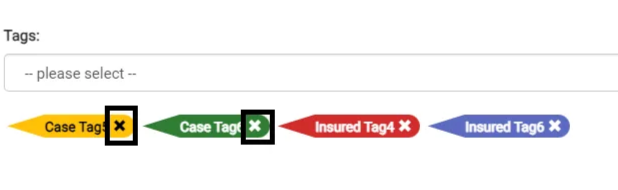
Removing a tag
In order to remove a tag, just click on the close button next to the tag.
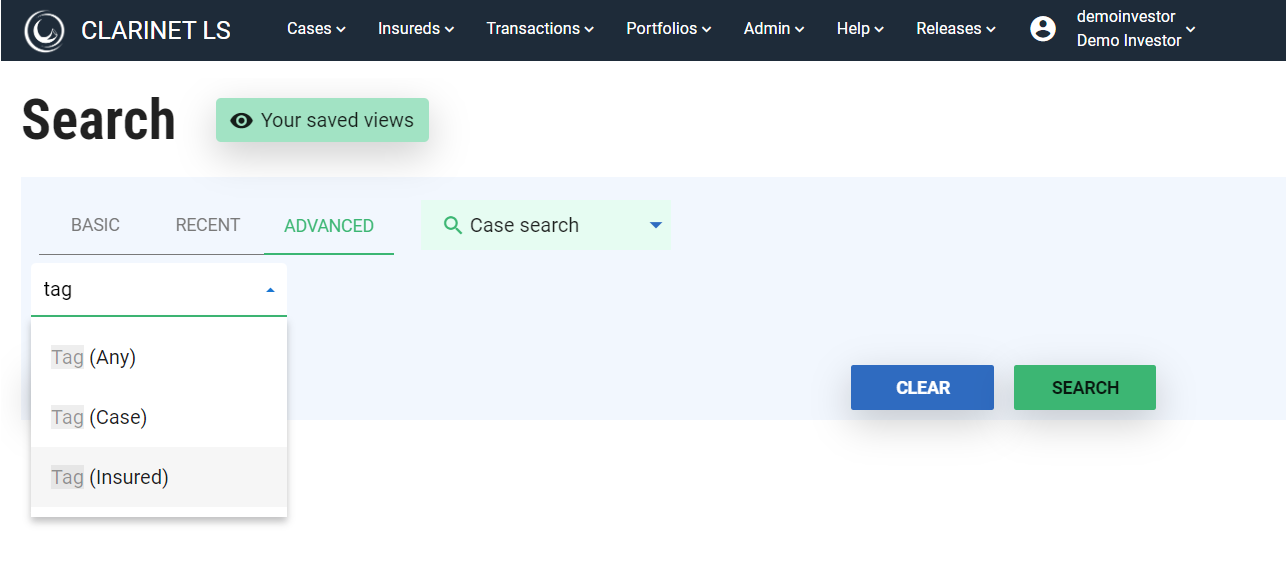
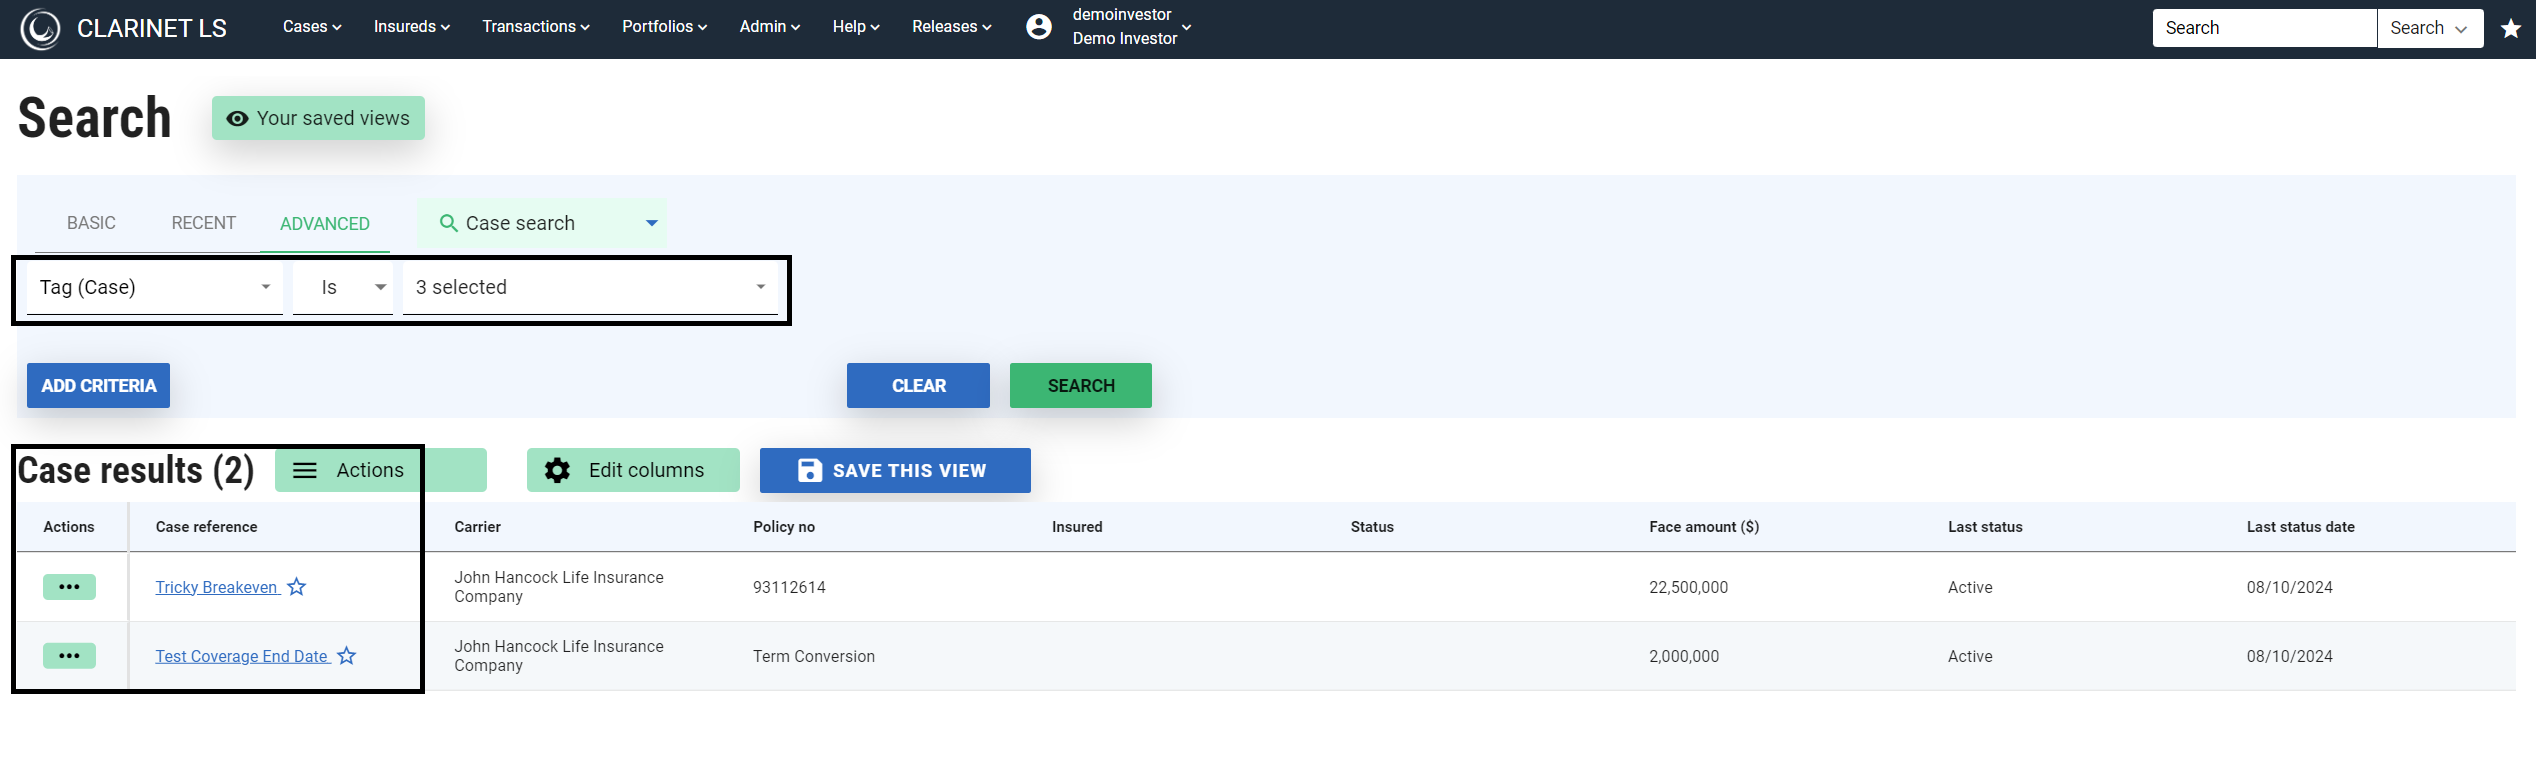
Searching for cases
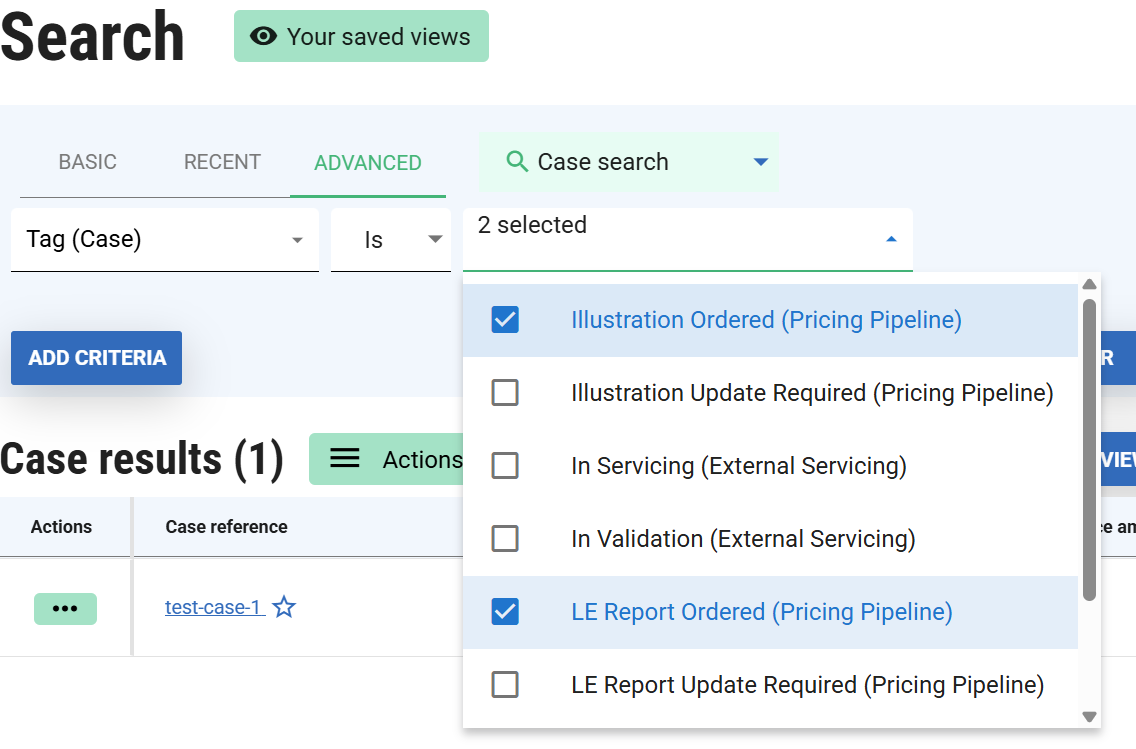
ClariNetLS allows you to search for cases by tag names attached to the case page or Insured page.
To perform this operation, navigate to the advanced search page and search for the criteria “Tag” and select the tag names.
All the cases with the selected tag names will be listed as shown below:
Exporting tags
Custom Reporting
You can export cases with case/ Insured tags attached with the help of Custom reports or Export templates reports.
For custom reports:
- Navigate to Admin → Exports & Reports page.
- Edit the custom report of your interest
- Expand Case and select Case Tag or expand Primary/Secondary Insured and select Insured Tag

An example of an exported report with case reference, case, and Insured tags will be as shown below:

Export Templates
For Export Template report creation, you can simply add all the required tags to the scratchpad and create a new template out of it. This template can be run against a case or portfolio on an Advanced search page or on the portfolios page.
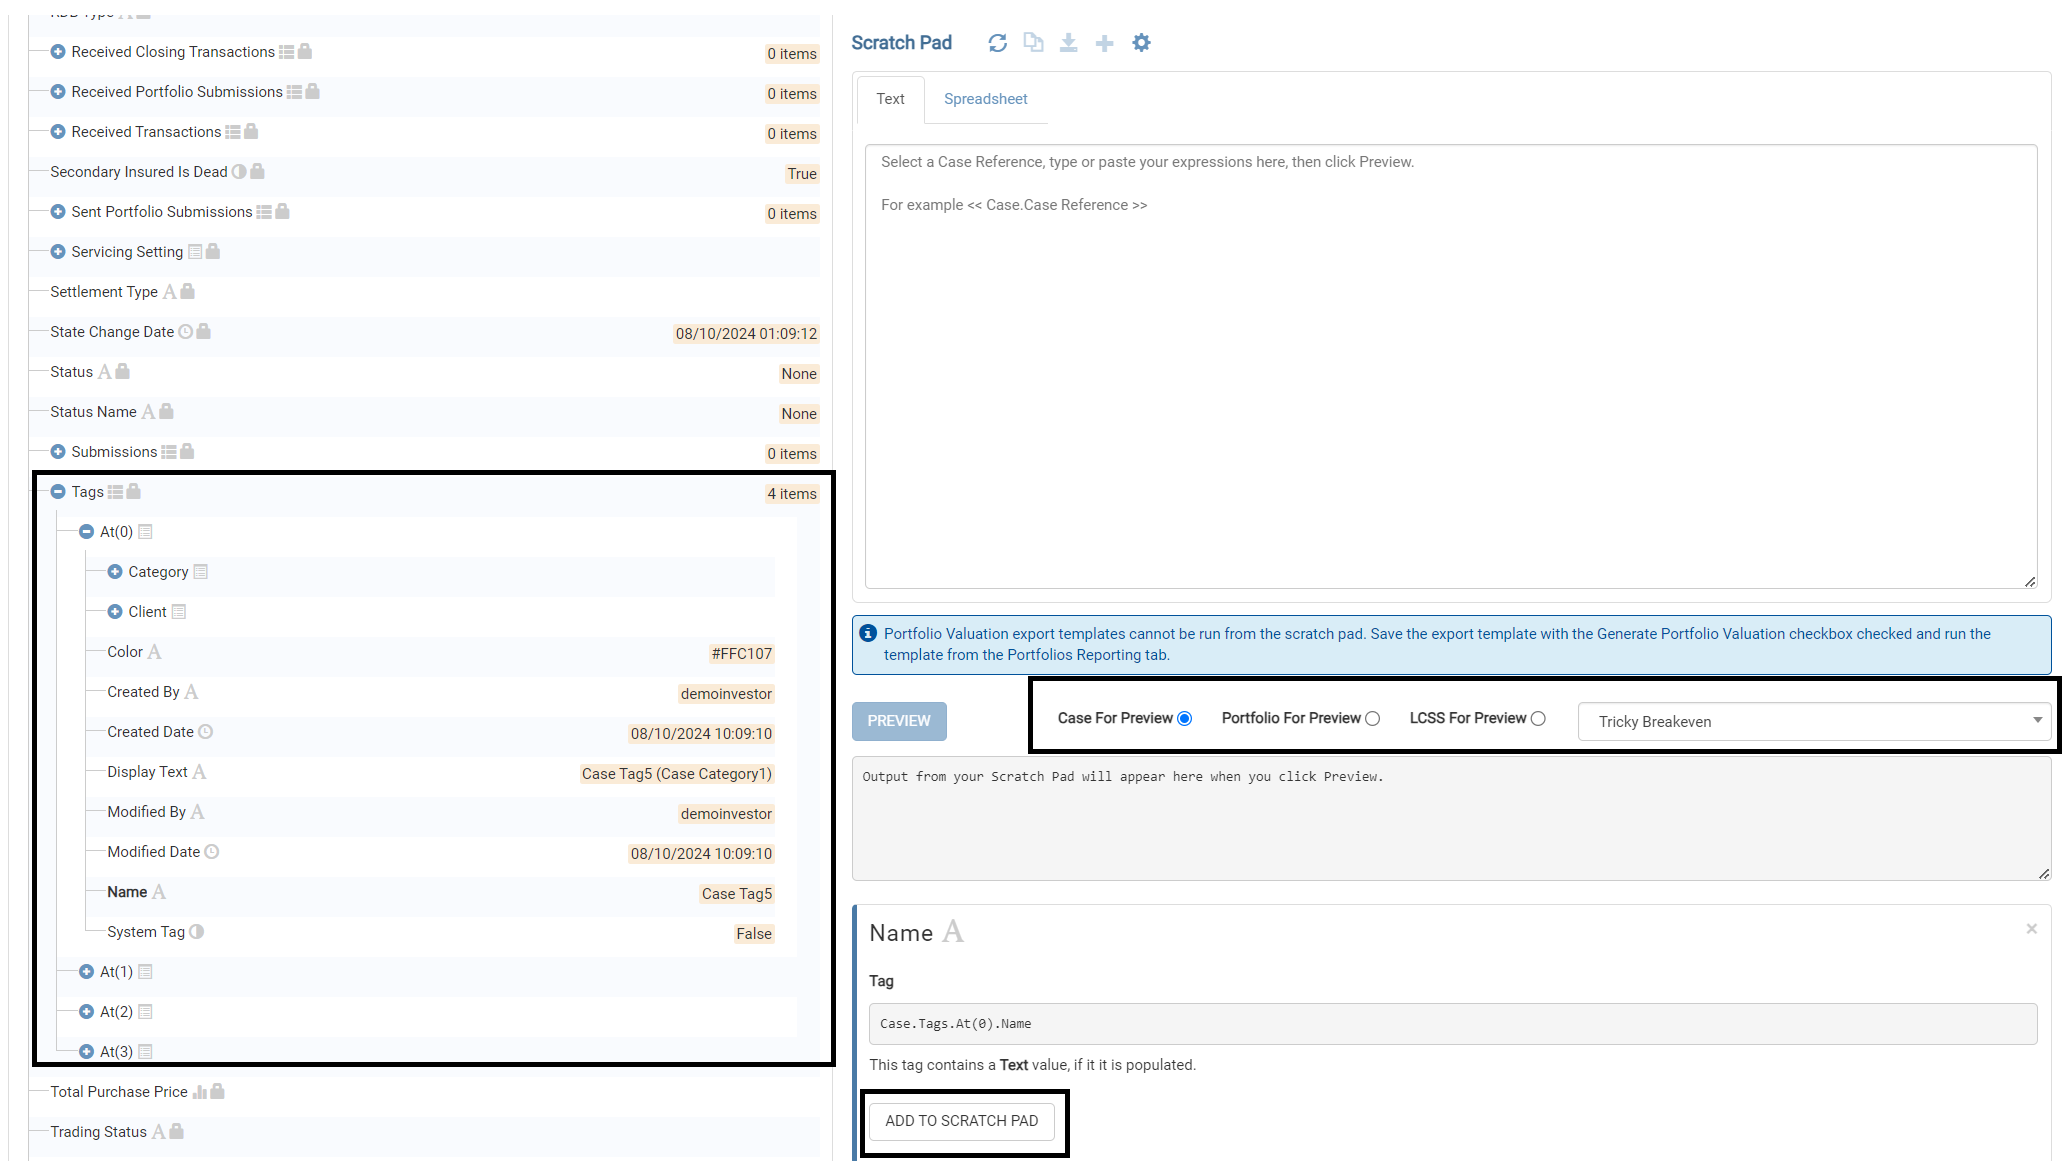
To add text to scratchpad which will retrieve tag information:
Ensure that the CASE of interest with tags attached is selected for preview. If not the tag information will not be displayed.
- Navigate to Settings → Export Templates page.
- Click on the Tag Explorer tab.
- Select a case of interest.
- Expand Case.
- Click on tags.
- Based on the number of tags attached to a case, you can see the numbering as At(0), At(1), and so on. Expand the same to see tag names and more information as in Created by and whether the tag is a system tag or not. Select or click on the required tag information.
- Click on ADD TO SCRATCH PAD.
An example of an export template with tag information is shown below:
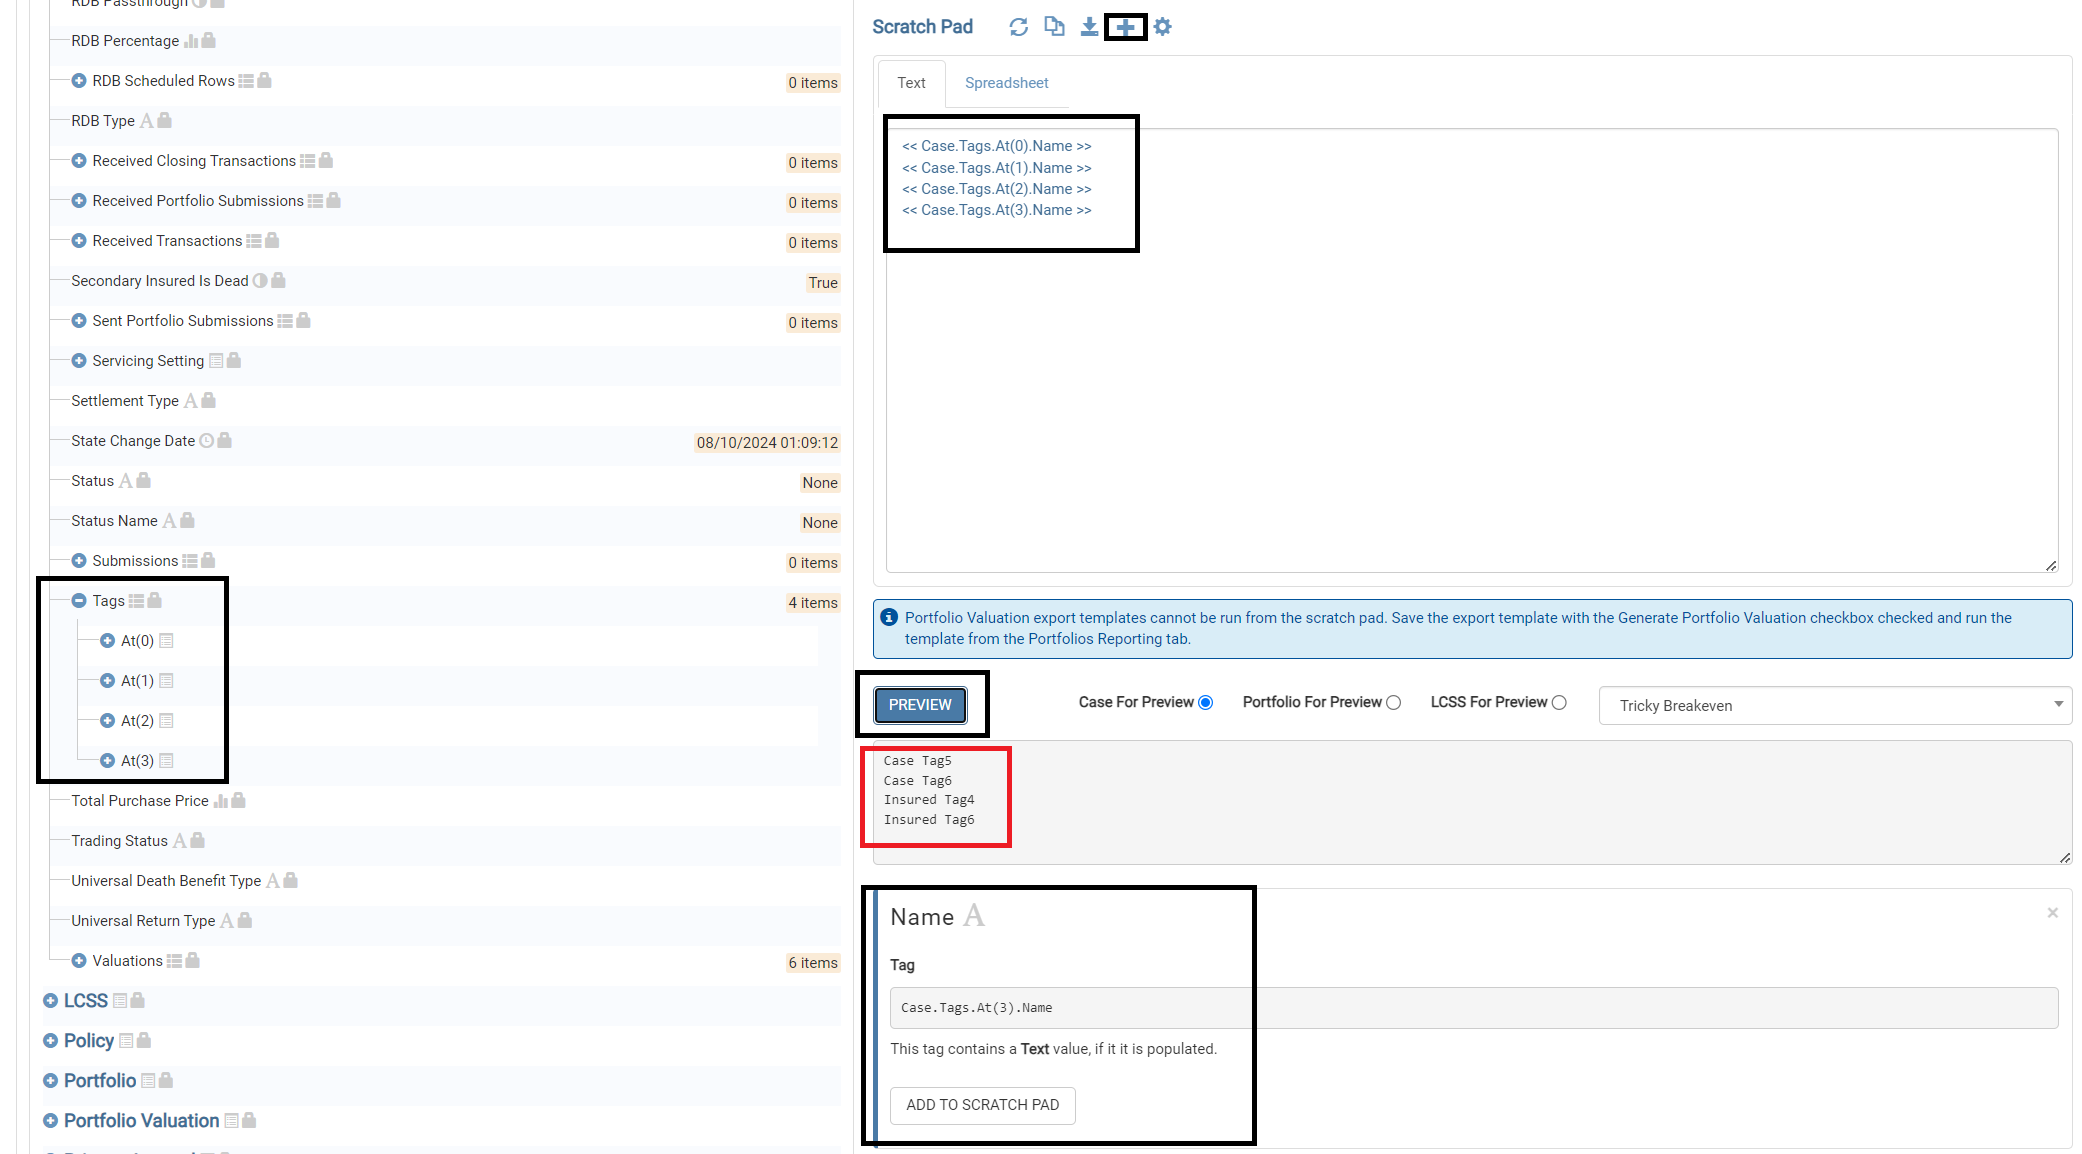
A new template can be created using the content of the scratch pad by clicking on the “+” button highlighted in the screenshot above and the template can be run from the Advanced search page or on the portfolios page on the cases searched for.
Demo on how to use tag management feature
Using Tags For Managing Workflows
Example workflow
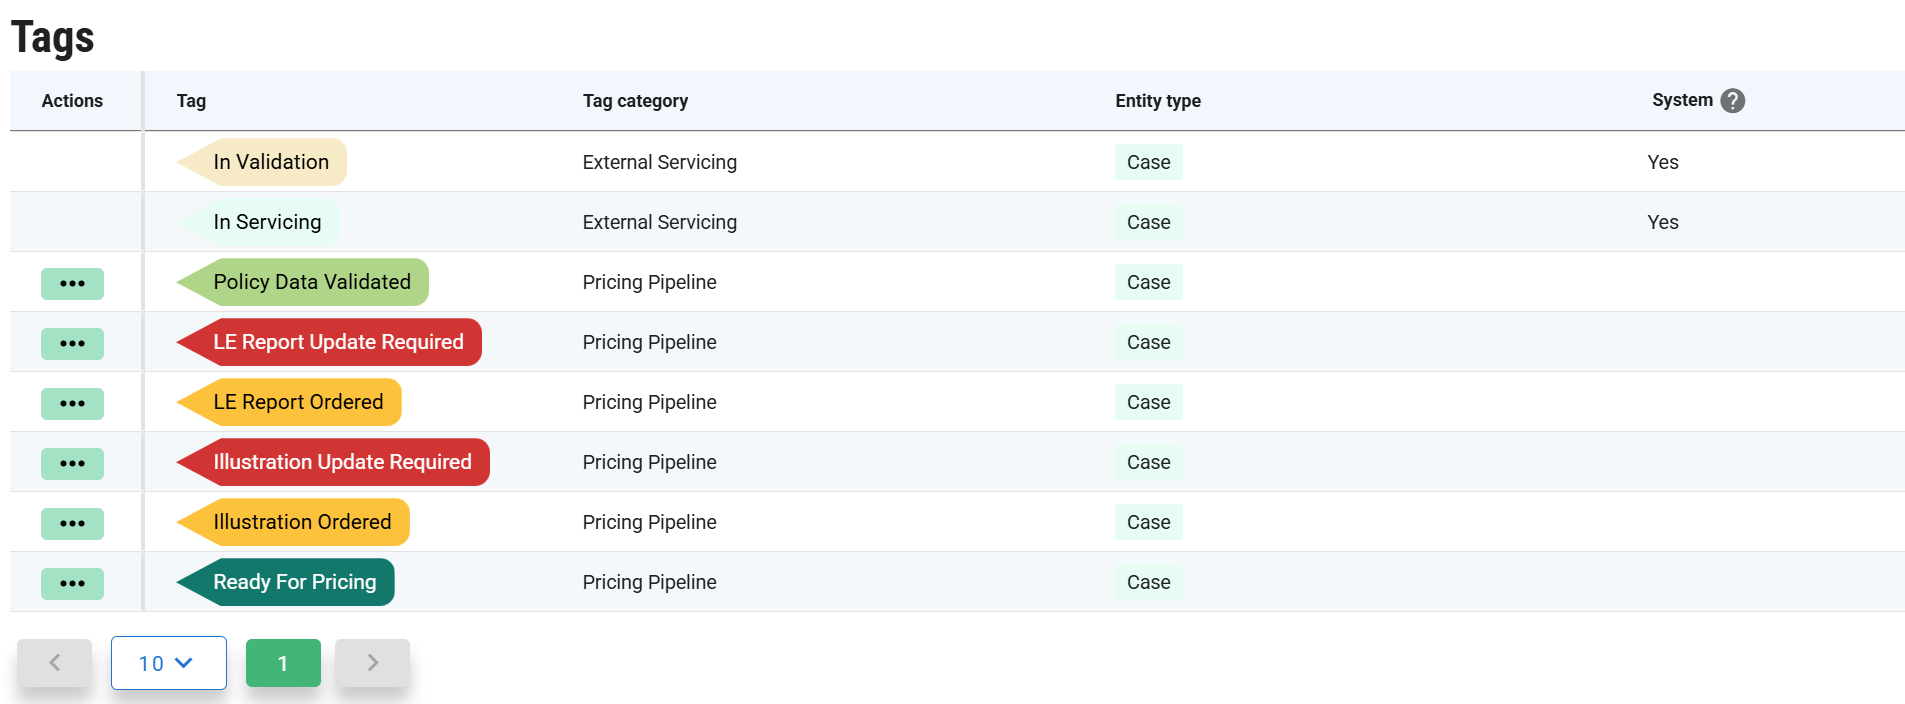
Tags can be used as the driving force behind user-defined workflows. Let’s work through a hypothetical example of getting a policy ready for pricing.
- Policy data validated
- Case/Policy/Insured data has been checked/verified against the documents and is confirmed to be correctly entered into ClariNet
- LE Report update required
- LE Reports either missing or invalid/too old.
- LE Report ordered
- A report for new LE Report(s) has been made but they haven’t been received/entered into ClariNet.
- Illustration update required
- Illustration either missing or invalid/too old.
- Illustration ordered
- A new Illustration has been ordered by not received/entered into ClariNet.
- Ready for pricing
- All data is present and correct for pricing.
Each task might be handled by a different person/team. We can model this workflow with tags and use saved views to function as task lists.
Tag setup
There are many ways to set the tags up, we’ll use the simplest option: 1 tag category, “Pricing Pipeline” with “Multiple tags” checked.
Task lists
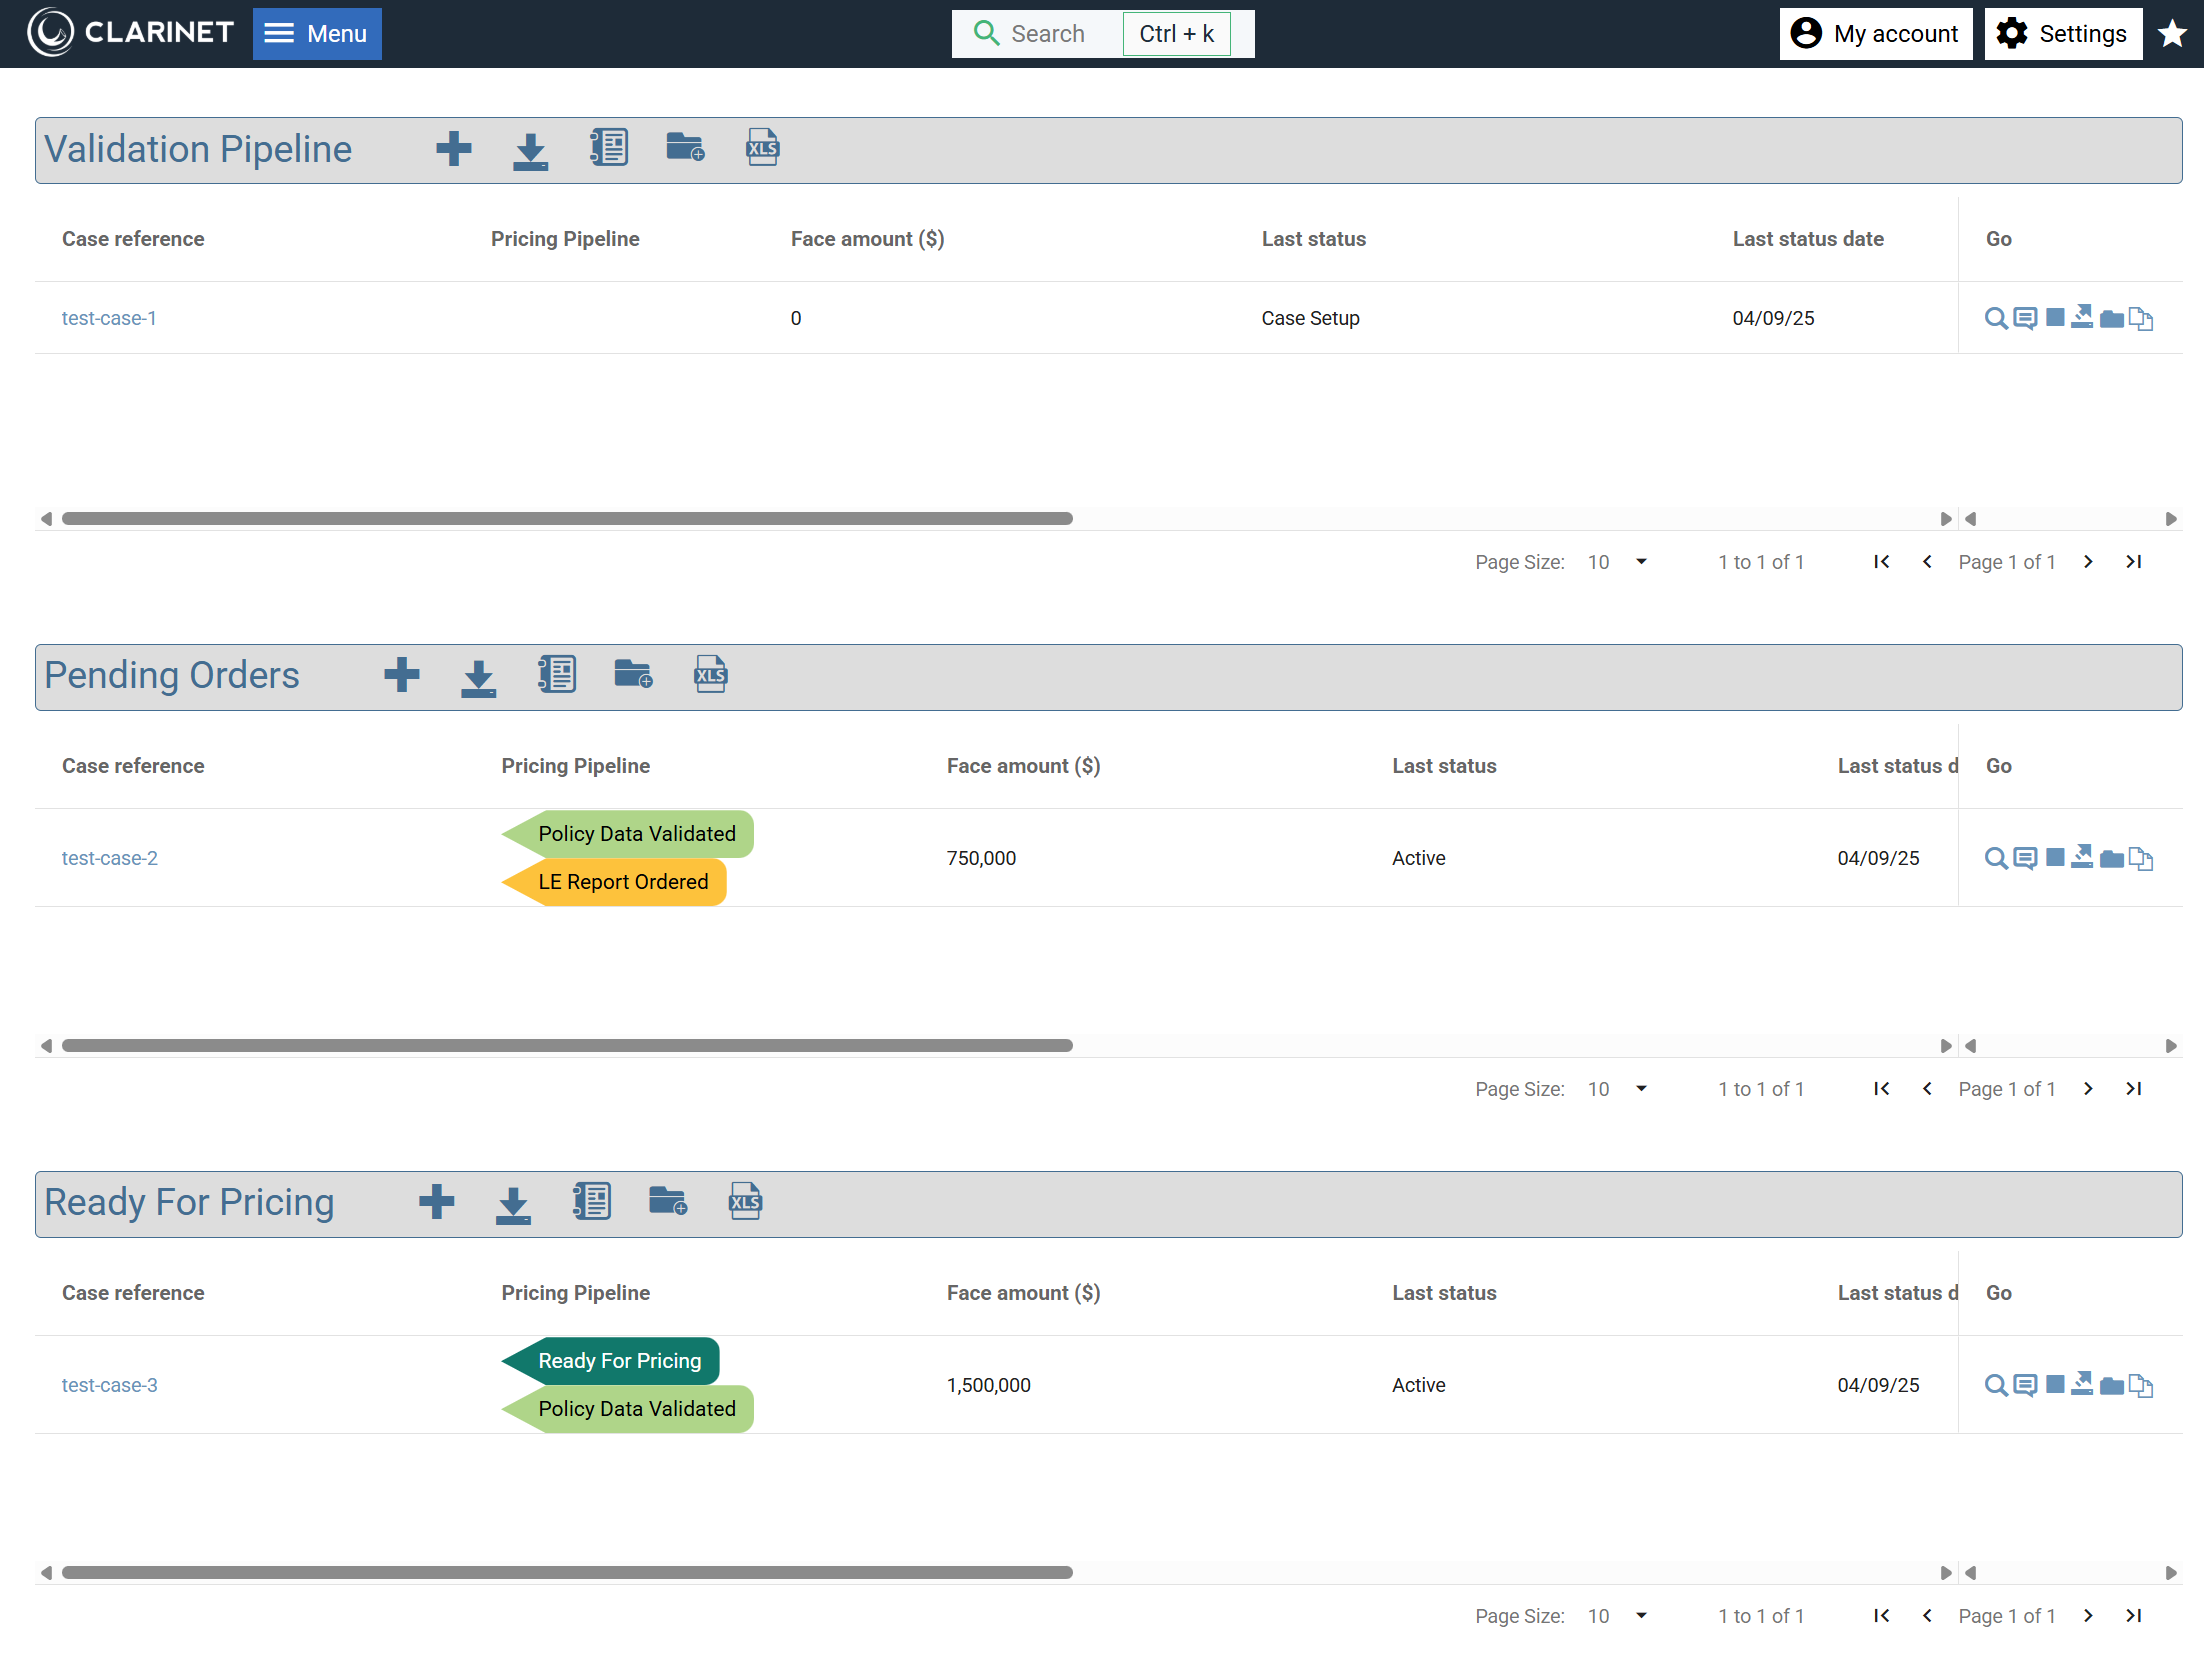
The first view we could create is one for cases that haven’t yet been validated:
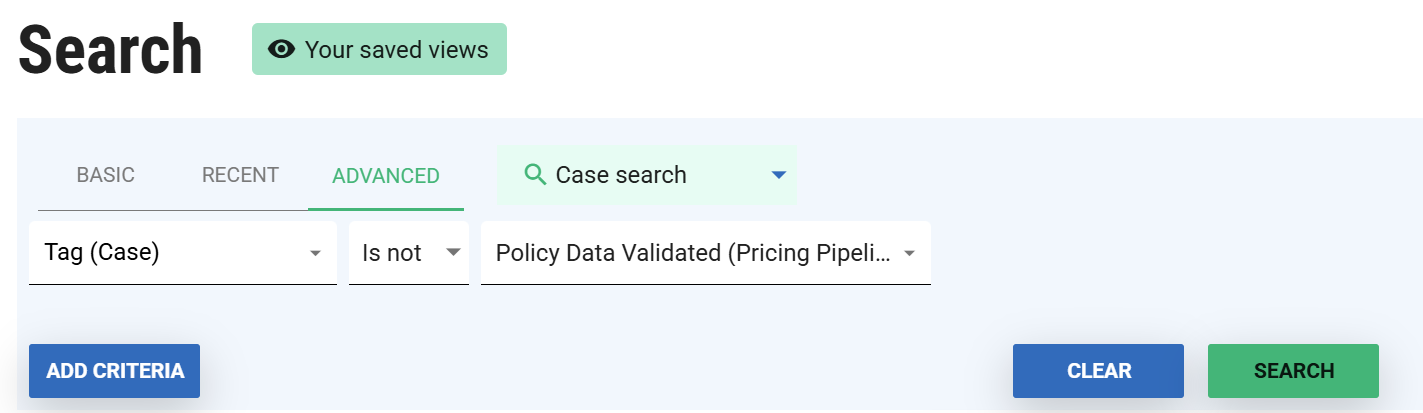
Let’s save that as a saved view and share it: “Validation Pipeline”.
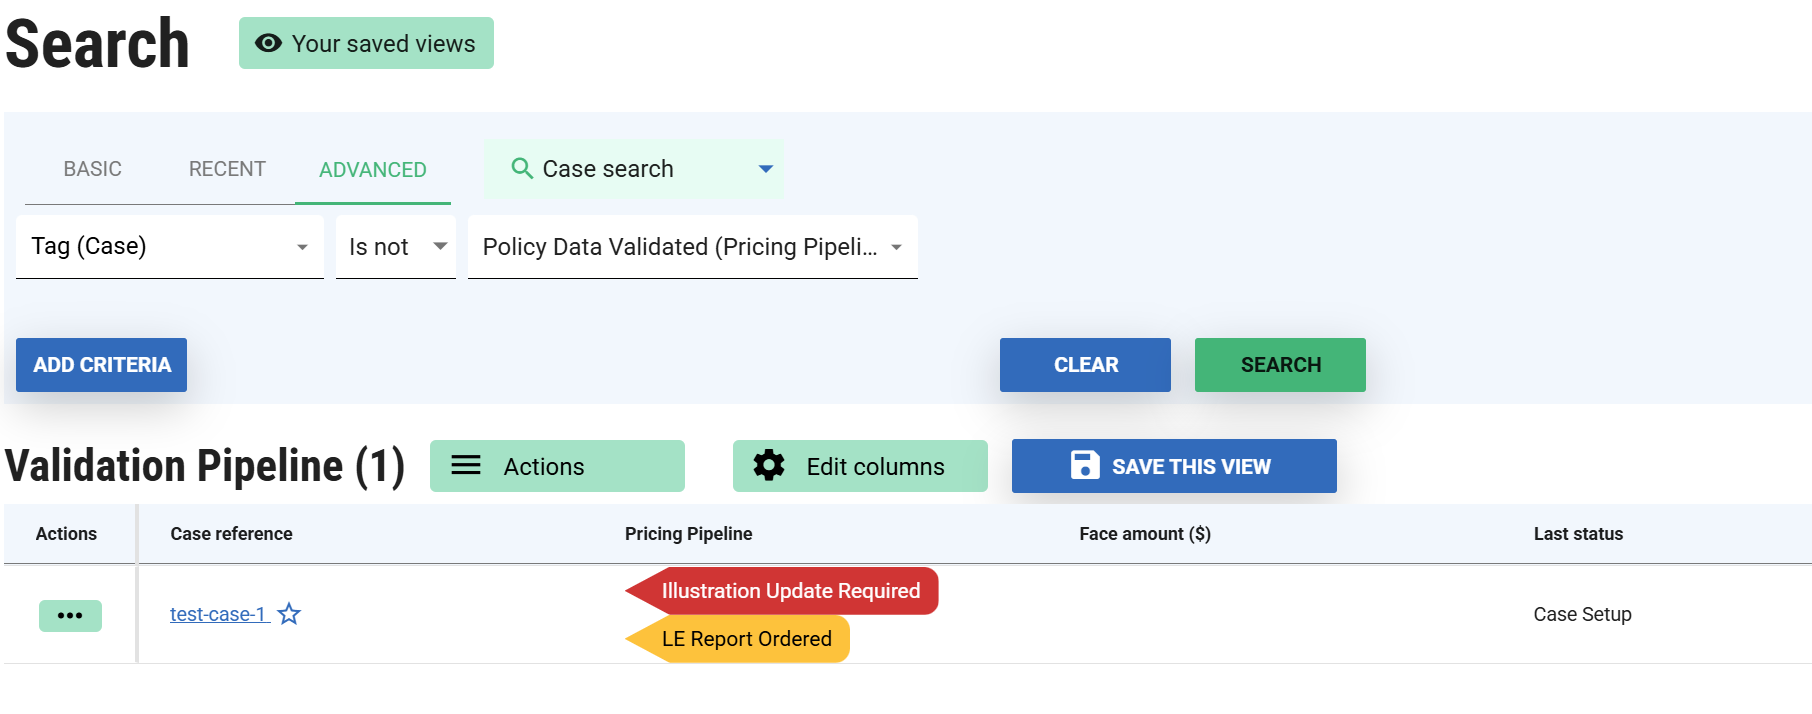
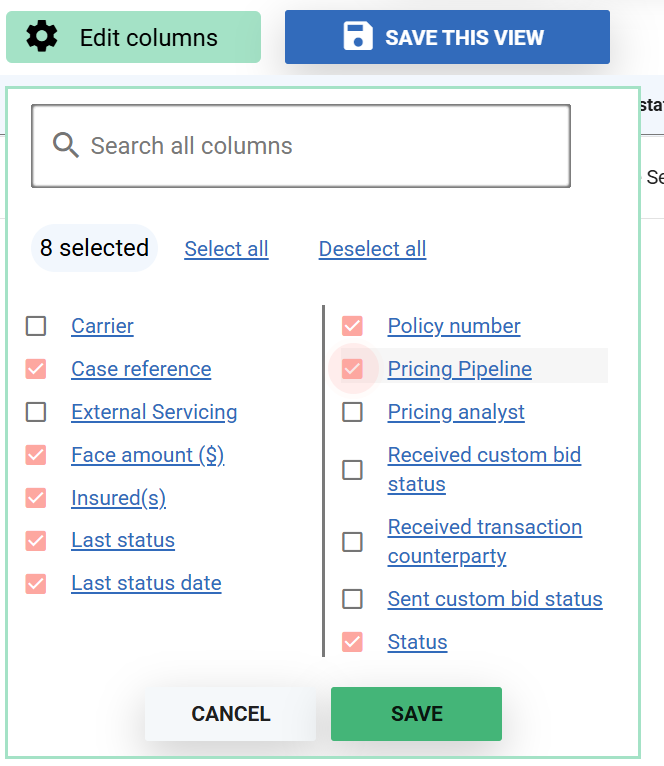
Note that the tags can be added to the list of columns using the “Edit columns” button and selecting the tag category:
The user(s) in charge of this step of the workflow can have this saved view on their home page and use it as a list of cases that need to have policy data verified. Saved views can be added to your homepage using the “My account” menu, “Customize home page”.
Similar views can be created for other steps in the workflow using the presence (or lack) of tags to signify a significant step. Another example might be a “Pending Orders” view:
Another view for “Ready For Pricing” cases would be used by the pricing team to know which cases need to be priced.
Adding and Removing tags
In this example workflow, a new case is onboarded without the “Policy Data Validated” tag. This is immediately visible in the “Validation Pipeline” view we created. User A has this list on their homepage and starts work on validating the case/policy/insured data. As part of this checklist, the user notes that the illustration is out of date so adds the “Illustration Update Required” tag. All other data is fine so the user adds a comment to the case and the “Policy Data Validated” tag is added. Another user, using a saved view for cases tagged with “Illustration Update Required” creates a new Illustration order and removes the “Illustration Update Required” tag and adds “Illustration Ordered” tag.
Some time later, the Illustration is received and a user enters the information into ClariNet. At the end of the process, they remove the “Illustration Ordered” tag and, noting that nothing else is outstanding on the case, they add the “Ready For Pricing” tag.
This appears in a saved view used by the pricing team who pick the case up and do the pricing work. If the pricing team were to see something wrong with the data, they could remove the “Ready For Pricing” tag and add another tag e.g. “LE Report Update Required” to push the case back to another user/team.
Example home page
Adding the saved views to the home page can give an effective view of cases with outstanding tasks easily.