Case
Prerequisites: Before reading this guide you should be familiar with the process of logging into your
user account in ClariNet LS and accessing your Home Page, see First Steps Using ClariNet LS . You should also be familiar with the ClariNet LS Case pages and with the process of creating an Organization in your CRM.
Here you will find help on creating a new Case in ClariNet LS using either Case View or a Form.
A Case is a collection of different objects related to a single life insurance policy, such as a Policy, one or two Insureds, Illustrations, Verifications of Coverage and one or more Premium Schedules.
ClariNet LS allows multiple users to view, download and generate the same Case data simultaneously but not to edit data at the same time. This feature, called Case Locking keeps a record of the user who is editing a Case, thereby preventing simultaneous editing by other users.
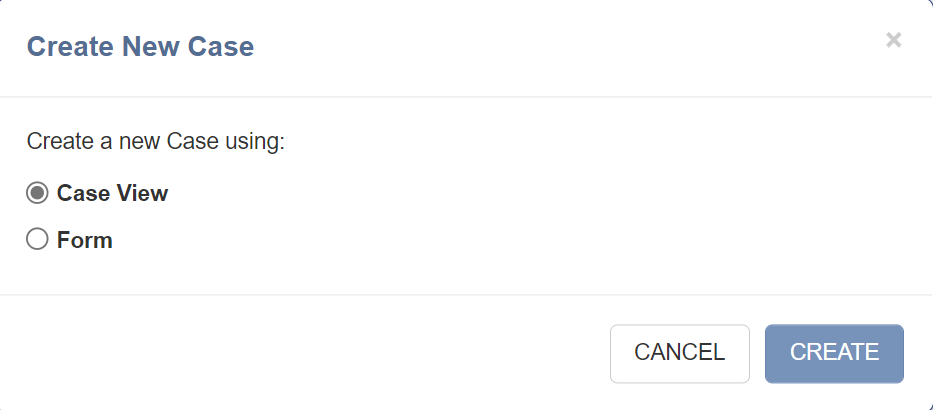
Create a Case using Case View
Start by clicking the Menu Button in the top bar, then click on Create A New Case (Case View) under the Cases menu; or by clicking the Add button to display the Create New Case dialog and selecting the Case View option followed by the CREATE button.
This opens the Case page.
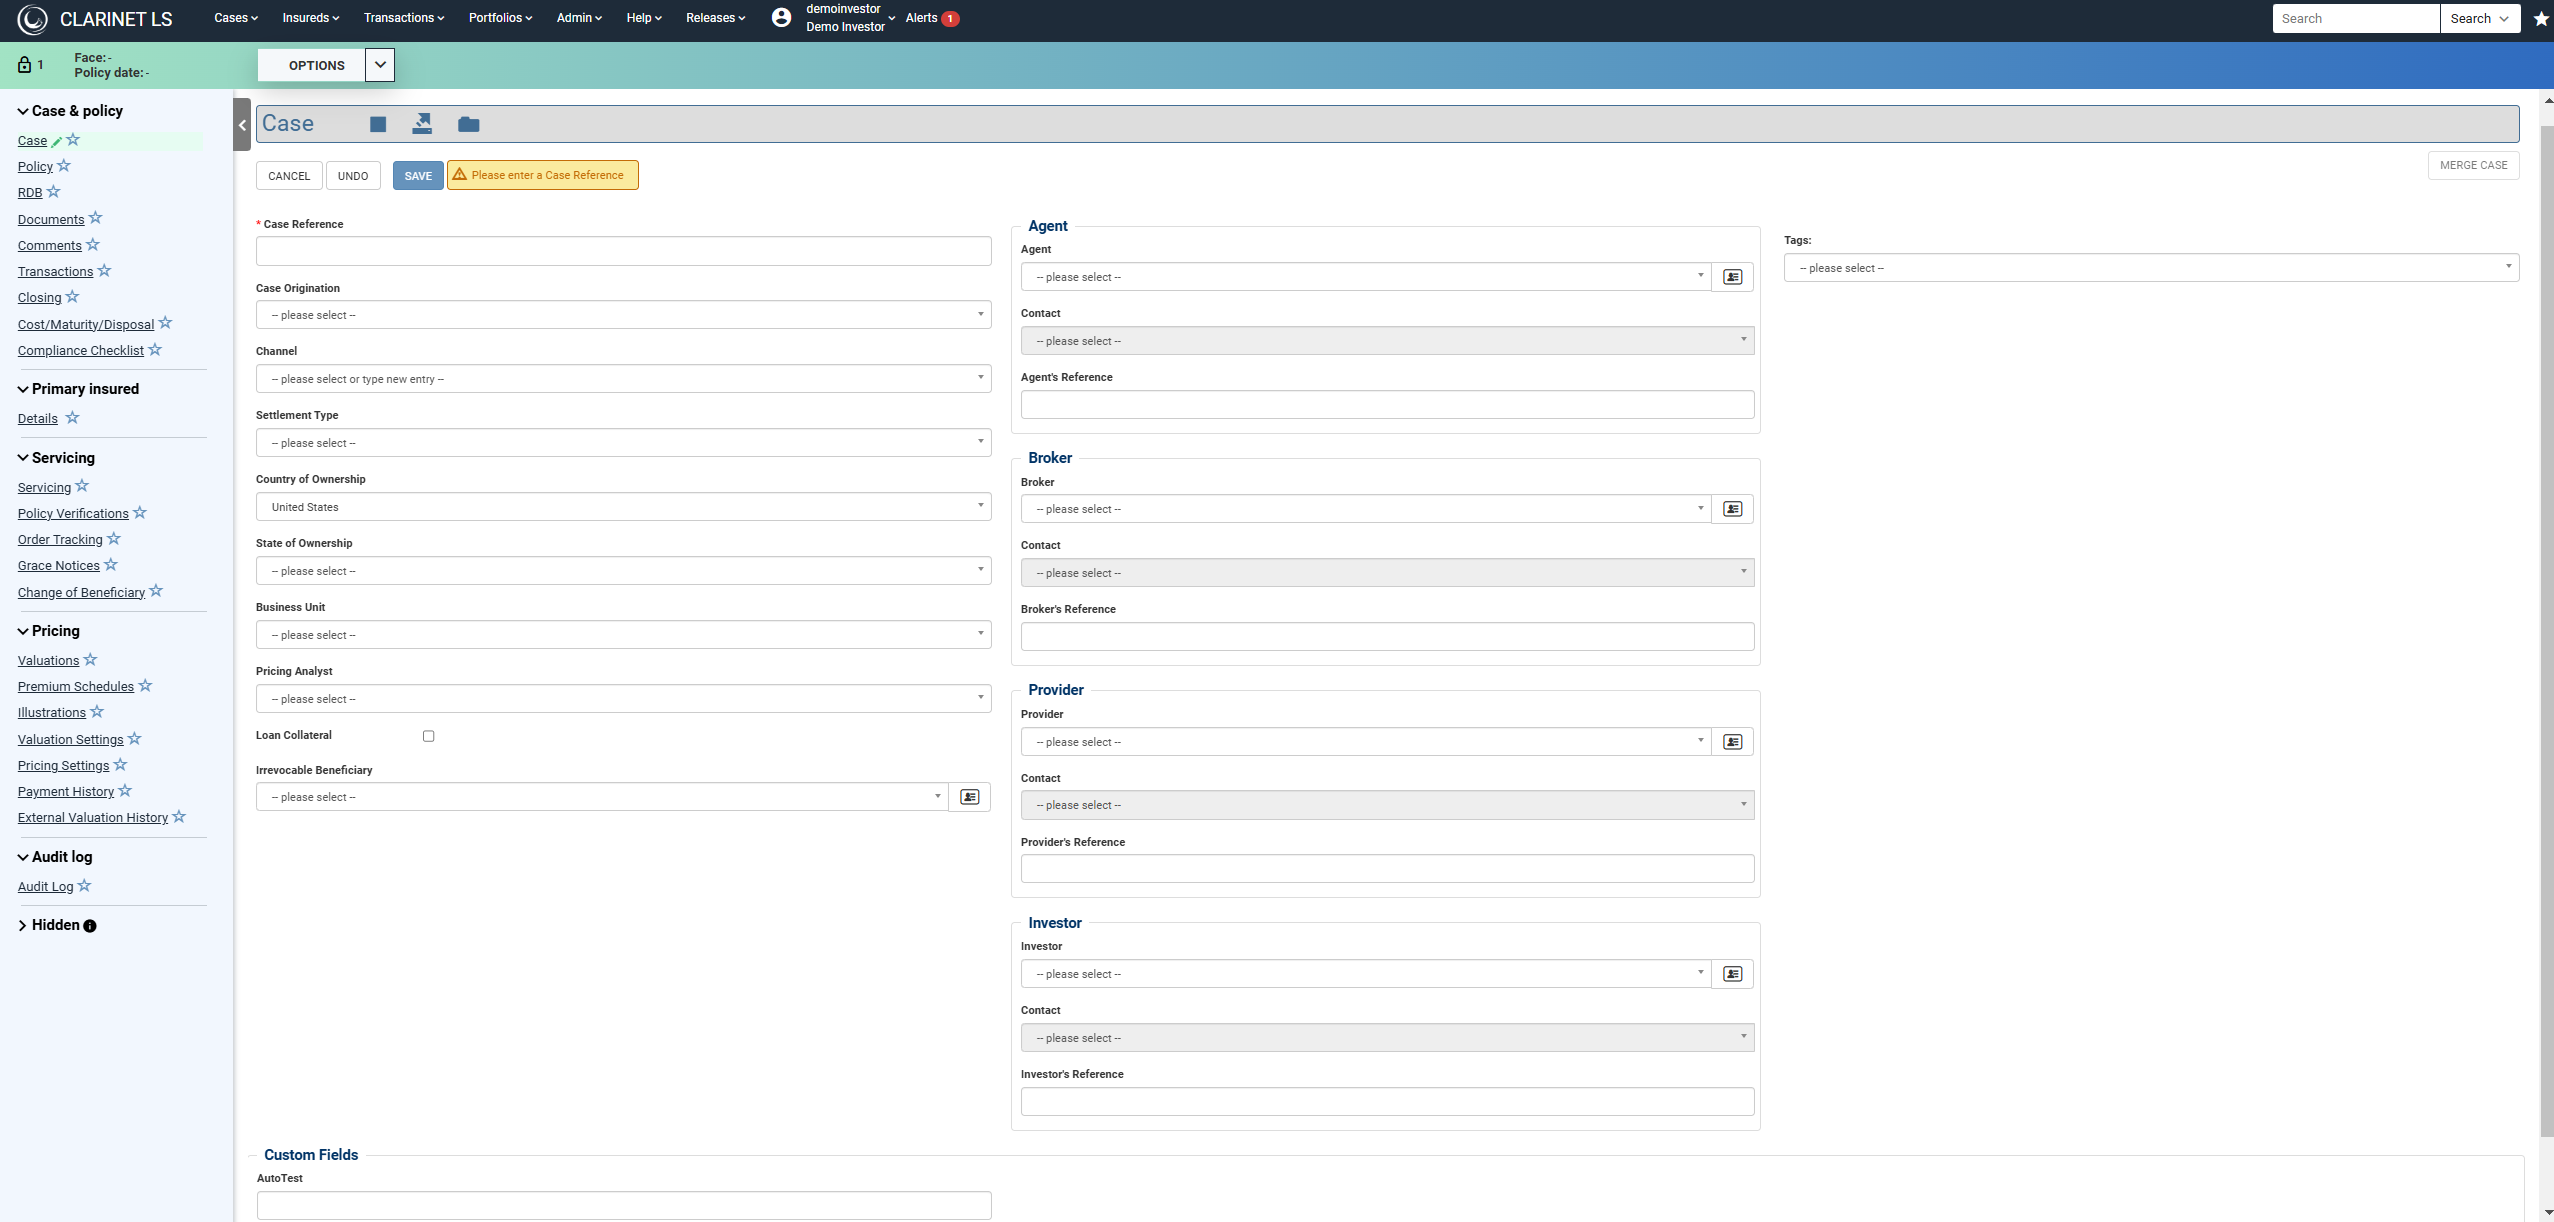
Complete the following fields as required:
| Name | Description | Required | Permitted Values |
|---|---|---|---|
| Case Reference | Enter a unique reference for the Case. | Yes | Alphanumeric |
| Case Origination | Select either Secondary or Tertiary . | No | Dropdown |
| Channel | Select or type a value. | No | Dropdown or Text |
| Settlement Type | Select either Life Settlement or Viatical. | No | Dropdown |
| Country of Ownership | The country in which the Owner is resident. Default to United States. | No | Date |
| Business Unit | A dropdown list of all Business Units in your CRM. | No | Dropdown |
| Pricing Analyst | A dropdown list of all Pricing Analysts in your CRM. | No | Dropdown |
| Loan Collateral | Check or uncheck the box. | No | Checkbox |
| Irrevocable Beneficiary | A dropdown list of alI irrevocable Beneficiaries in your CRM. | No | Dropdown |
There are then 4 sections with self-explanatory fields for Agent, Broker, Provider and Investor.
Once you have completed the necessary fields, click Save to create the new Case. Next, you would typically enter the Policy and Insured information using the left menu.
Create a Case using a Form
This method is designed for brokers and providers who want to add details of a Received Transaction at the same time as creating the Case.
Start by clicking the Menu Button in the top bar, then click on Create A New Case (Form) under the Cases menu or by clicking the Add button to display the Create New Case dialog and selecting the Form option followed by the CREATE button.
This opens the Case Setup Form comprising 4 sections.
Case Information
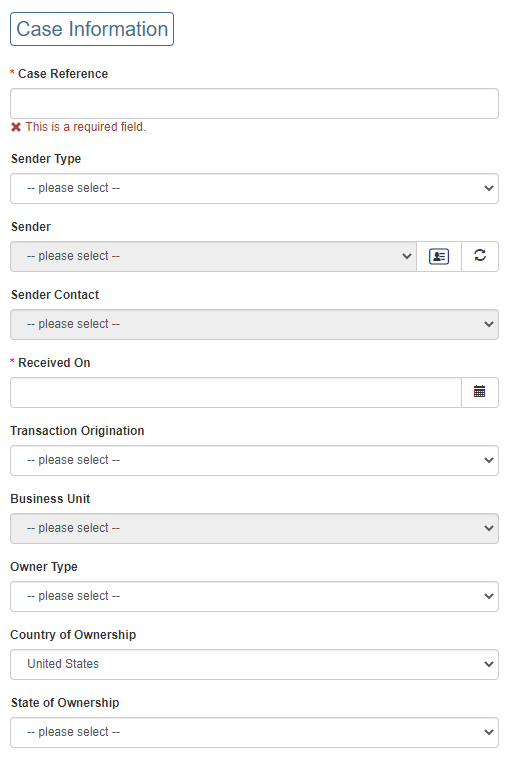
These fields create the basic information to support the Case and the associated Received Transaction:
| Name | Description | Required | Permitted Values |
|---|---|---|---|
| Case Reference | A unique reference for the Case. | Yes | Alphanumeric |
| Sender Type | The Role of the Sender (as used in the ClariNet LS CRM) for the Received Transaction. Note that only CRM entities which are Organizations can be attached as the Sender to a Transaction. Your choice of Role in this dropdown limits the entities shown in the Sender field below, e.g., if you select Broker, only Organizations with Role set to "Broker" will be displayed in the Sender dropdown. | No | Dropdown |
| Sender | A dropdown list of all Organizations in your CRM with the Role specified under Sender Type. To add a new Organization, click on the Add icon (the filecard) next to this field. This opens the CRM in a new browser window. Once you have added the new entity and closed the CRM, click the Refresh icon to display the newly-created Organization in this dropdown. | No | Dropdown |
| Sender Contact | Once you have selected the Sender, this dropdown populates with a list of all of the Contacts associated with the Organization which you have selected as the Sender. To add a new Contact, click on CRM under the Admin menu, add the new Contact and then click on the Refresh icon next to the Sender field. | No | Dropdown |
| Received On | The date on which you received the Case (defaults to today's date). | No | Date |
| Business Unit | A dropdown list of all Business Units in your CRM. | No | Dropdown |
| Owner Type | The type of entity which describes the Owner. The value entered here populates the Owner Type field on the Case tab. | No | Dropdown |
| Country of Ownership | The country in which the Owner is resident. Default to United States. The value entered here populates the Country of Ownership field on the Case tab. | Yes | Dropdown |
| State of Ownership | The state in which the Owner is resident. The value entered here populates the State of Ownership field on the Case tab. | Yes |
Policy Information
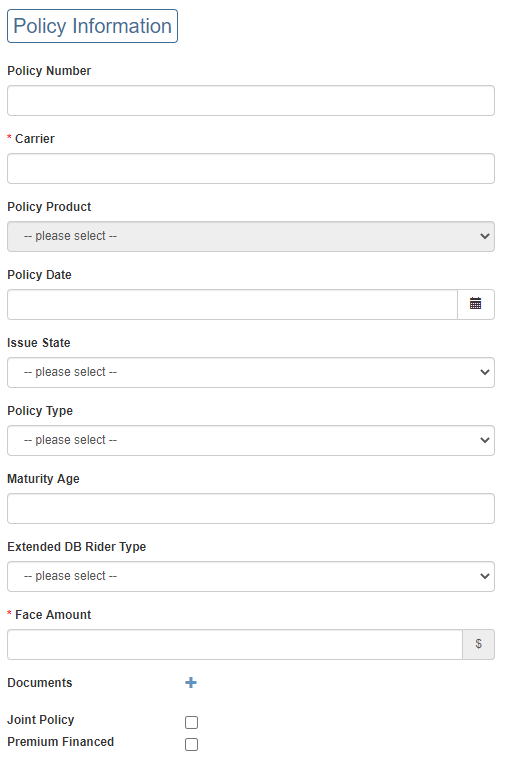
These fields collect the basic information required to populate the fields on the Case, Policy page.
Not all required fields are captured at this stage. If you attempt to edit the Policy page for a Case created with the Case Setup Form, you may need to complete the required fields before changes can be
saved.
| Name | Description | Required | Permitted Values |
|---|---|---|---|
| Policy Number | A unique reference for the Case. | Yes | Alphanumeric |
| Carrier | The insurance company which is responsible for the Policy. This may not be the same entity as the company which issued the Policy. This field references a database of insurance companies provided by AM Best; typing in a few letters from the name of the company (or the company's NAIC number) will bring up a list of options from which you can pick one. | Yes | Lookup |
| Policy Product | If any Policy Products have been created for the insurance company selected as the Carrier, they are listed in this dropdown. | No | Dropdown |
| Policy Date | The date as of which coverage began under the Policy. Note that this may not be the same date as the Policy Issue Date. | No | Date |
| Issue State | The state in which the Policy was issued. | No | Dropdown |
| Policy Type | A dropdown list of all policy types. | No | Dropdown |
| Maturity Age | The attained age of the Insured by reference to which monthly deductions (and, in some instances, the Coverage End Date) is calculated. For "second to die" Policies, this is the attained age of the younger Insured. | No | Numeric (between 90 and 125) |
| Extended DB Rider Type | The attained age up to which the Carrier will pay the Death Benefit, if this is later than the Maturity Age. | No | Dropdown |
| Face Amount | The base amount of Death Benefit for the Policy. You should review the Policy Form and Schedule and any Illustrations carefully to ensure that this value is correct. | Yes | Numeric |
| Documents | Clicking the Add icon next to the Documents label allows for one or more documents (e.g., PDF, Word, Excel, MP3, WAV files) to be attached to the Case. | No | Link |
| Joint Policy* | Check this box if the Policy covers (or has covered) two Insureds. This will allow you to enter Insured Information for both Insureds. See additional notes below this table on entering a Joint Policy with only one surviving insured. | No | Checkbox |
| Premium Financed | Check this box if the Policy has been the subject of a premium finance loan arrangement at any point since issue. If there is no evidence of such an arrangement, you should leave this box unchecked. | No | Checkbox |
Entering a Joint Policy with only one surviving insured can be done in two different ways:
- If you have the DOB, gender and DOD of the deceased insured, then create the Case as a joint life Case (on the Policy tab, set Joint Life Payout Type as “Second to die”). This will then add the Secondary Insured tab to the Case. Enter the surviving Insured’s information on the Primary Insured tab and the deceased Insured’s information (at least the DOB, gender and DOD) on the Secondary Insured tab. This is the better approach as ClariNet LS will then be able to correctly calculate the Deduction End Date and Coverage End Date, as this is based on the age of the younger insured; or
- If you do not have the deceased insured’s information, then set the Case up as a single life Case. You may need to adjust the Maturity Age and Extended DB Age to reflect any age difference between the surviving Insured and the deceased Insured, although if the surviving Insured is the younger, this step won’t be necessary.
Insured Information
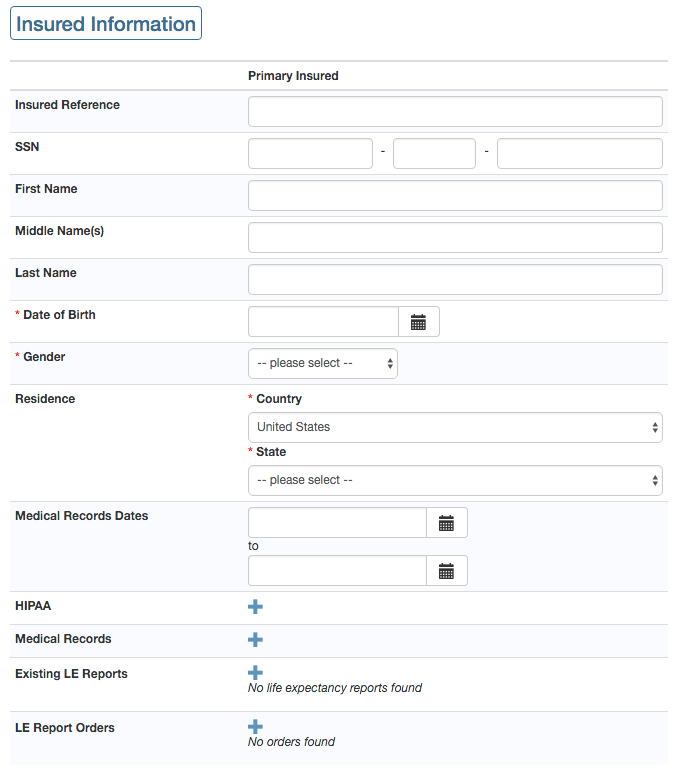
All of the fields in this section map to the corresponding fields on the Primary Insured page for a Case. Note that if you check the Joint Policy box in the Policy Information section, these fields will also appear in a column headed "Secondary Insured". Documents attached to the Case through this section will also appear on the Documents page as well as the Insured Lives tab.
| Field Name | Description | Required | Permitted Values |
|---|---|---|---|
| Insured Reference | A unique reference for the Insured. This is used as a key to link to your CRM, where contact information for the Insured can be stored. | No | Alphanumeric |
| SSN | The US Social Security Number associated with the Insured. This follows the standard three number/two number/four number pattern. | No | Numeric |
| First Name | The first name of the Insured. | No | Alphanumeric |
| Middle Name(s) | The middle name(s) or middle initials of the Insured. | No | Alphanumeric |
| Last Name | The last name (or family name) of the Insured. | No | Alphanumeric |
| Date of Birth | The date of birth of the Insured. | Yes | Date |
| Gender | The gender of the Insured | Yes | Male/Female |
| Residence | The Country and, if relevant, the State in which the Insured is resident. Note that this does not link with contact information in the CRM. | Yes | Dropdown |
| Medical Record Dates | The start date and end date of the Medical Records which you hold for this Insured. | No | Date |
| HIPAA | A document link to attach one or more documents of Document Type= "HIPAA Release" (e.g., Authorization to receive Medical Information, or similar) for the Insured. | No | Link |
| Medical Records | A document link to attach one or more documents of Document Type = "Medical Records" for the Insured. | No | Link |
| Existing LE Reports | A link to attach information and documents for Existing LE Reports for the Insured | No | Link |
| LE Report Orders | A link through which you can record an Order for an LE Report. | No | Link |
Clicking the Add icon next to Existing LE Reports opens a new window to add information on a LE Report for the Insured:
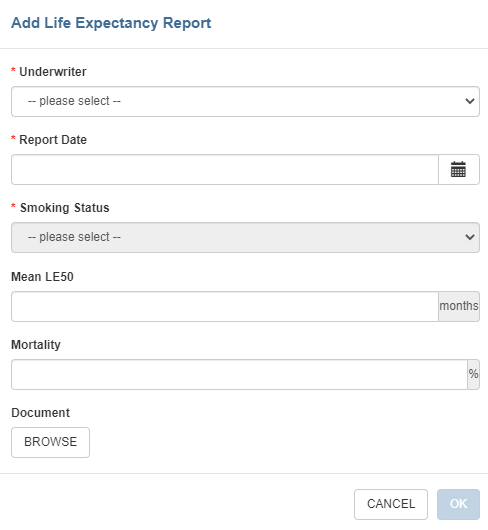
| Field Name | Description | Required | Permitted Values |
|---|---|---|---|
| Underwriter | Pick the Underwriter which has produced the LE Report. There is a list of relevant underwriters stored at system level; if your underwriter is not in the list, or you use in-house underwriting, select "User-Defined". | Yes | Dropdown |
| Report Date | The date of the LE Report. | Yes | Date |
| Smoking Status | Select one of the options; Non-smoker, Smoker or Unknown (treat as Non-smoker). | Yes | Dropdown |
| Mean LE50 | The number of months stated on the LE Report as being the mean point on the survival curve for the Insured. Be careful to enter the mean value in this field; some underwriters also include a median LE50 and a LE85 value. | Yes | Numeric (Must be a positive integer) |
| Mortality Factor | If stated on the LE Report, the mortality factor assigned by the Underwriter to the Insured. This is usually based on the Underwriter's own base mortality tables and will therefore vary from report to report. The LE Report may only show the Mortality Factor associated with the first period of the survival curve, for those LE Reports which are prepared with an erosive mortality factor, | No | Percentage |
| Document | Clicking BROWSE opens a file explorer window from which you can select a document to attach to the LE Report as Document Type="Life Expectancy Report". | No | Link |
Once the required fields have been populated, click OK to save the LE Report information and link it to the Insured.
Illustration Information
This section allows you to create an Illustration object for the Case without needing to enter all of the Illustration data.
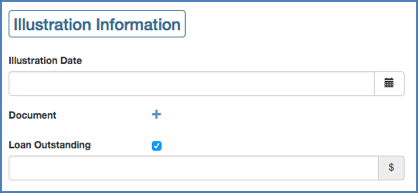
This is typically used by agents and brokers to set up the Case structure before sending the Case to a provider, as the provider may prefer to have its own pricing team enter the Illustration data.
Once you have completed the relevant sections, clicking Save at the bottom of the page creates the Case.