Illustration
Before reading this guide you should be familiar with the process of creating a new Case and entering information on the Policy page and the Insured Lives page. You may wish to read ‘Completing the Policy page’ as it describes terms used in this guide in more detail. You may also wish to read ‘Reading an Illustration’ and the associated example Illustrations to see how to locate data in different Illustration formats. This guide assumes that the Policy and Insured Lives pages have been completed sufficiently to accommodate an Illustration.
Objectives
After reading this guide, you should be familiar with how to create a new Illustration and edit an existing Illustration.
The Illustration page includes several non-required fields, to accommodate loans, Required Annual Premium (“RAP”) and term conversions. If none of these apply to your Policy/Illustration, you do not need to complete these fields. Prior to adding an Illustration, you may want to check that the values set on the Policy tab for the Case match those in the Illustration, particularly Policy Date, Policy Issue Date, Maturity Age and Extended DB Rider Age.
Case Summary: Illustrations Tab

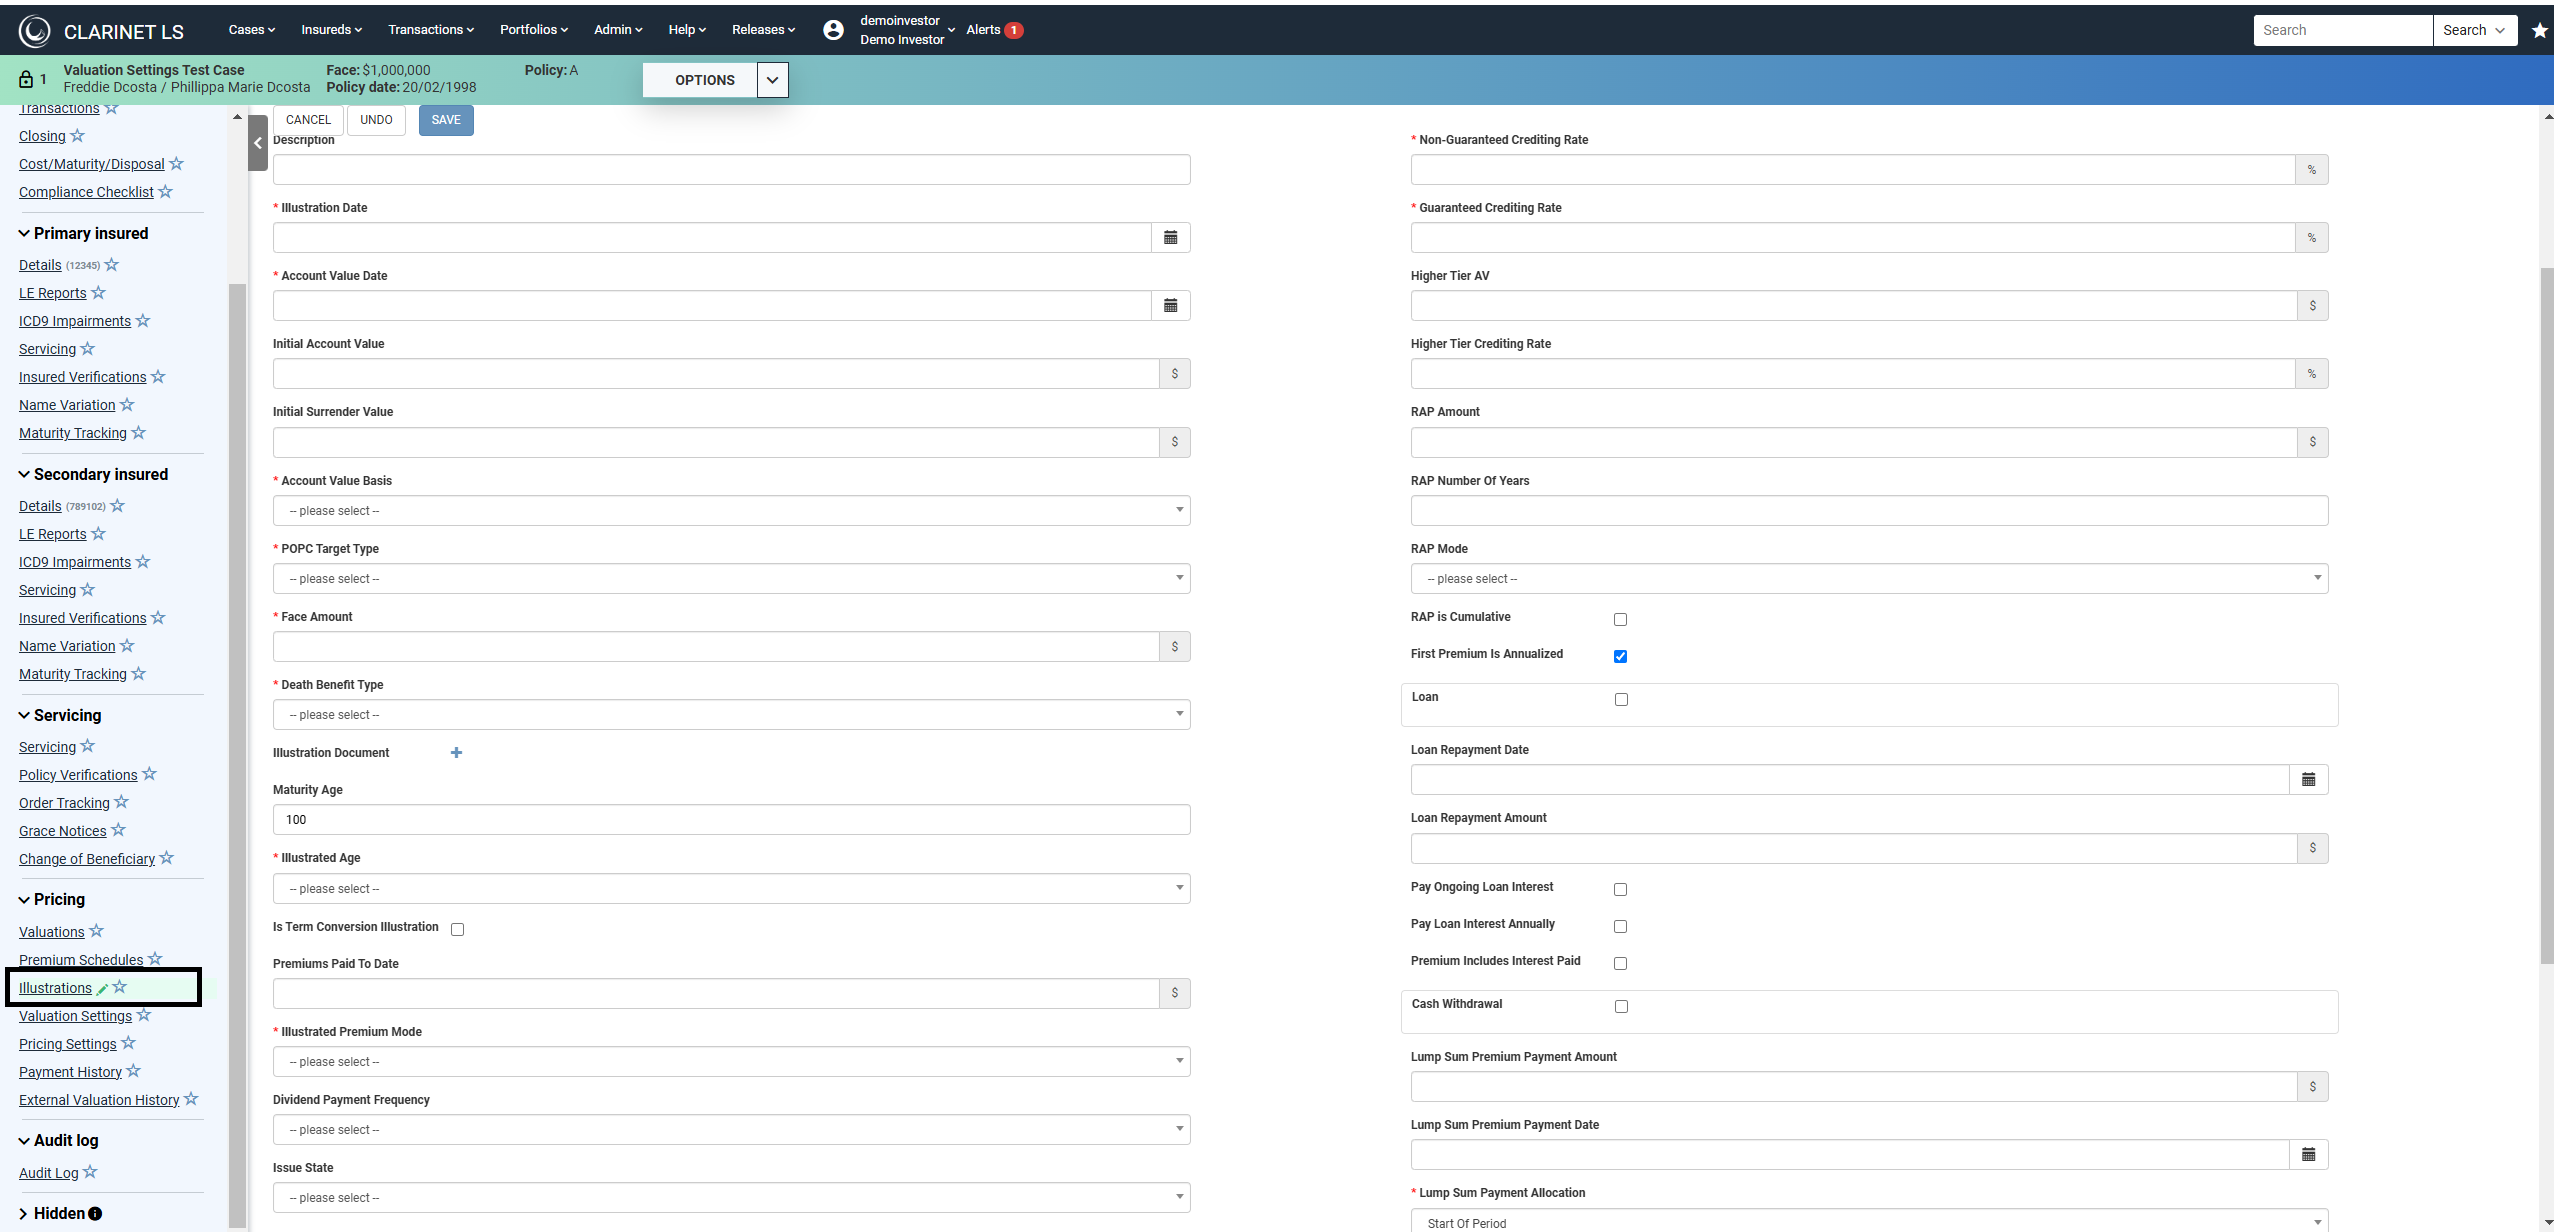
The Illustrations tab lists all Illustrations which have been added to the Case. Clicking the Add icon opens a new Illustration page:

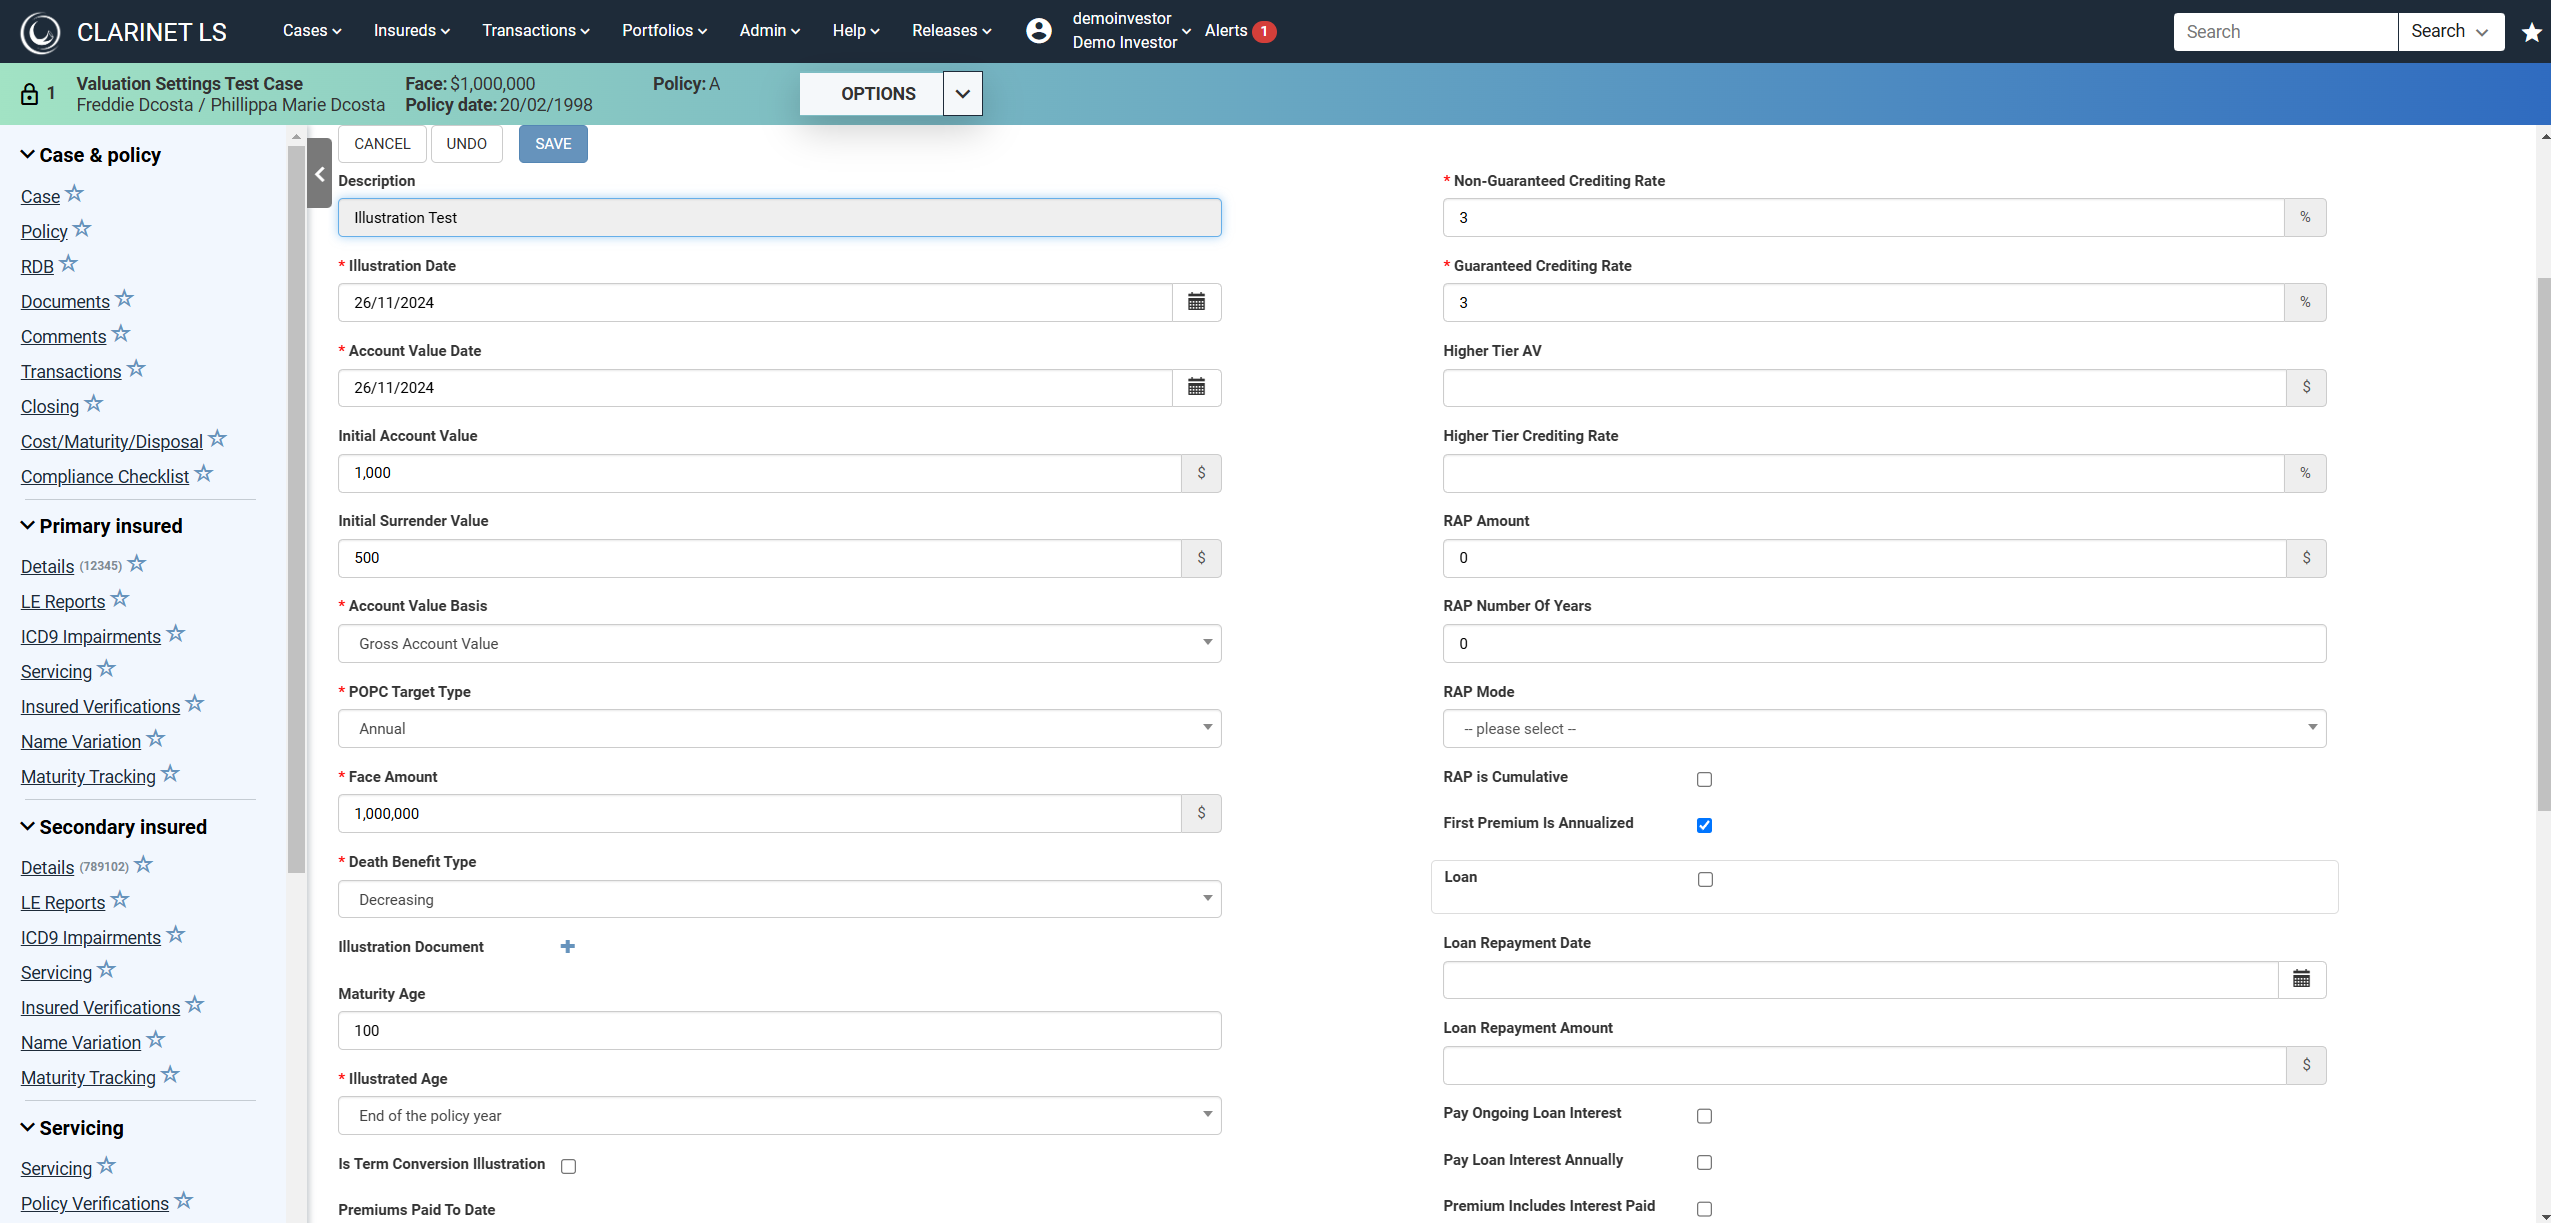
Adding an Illustration is a two-step process: first you enter information necessary to build the table of values; second, you enter values into that table. The information required to build the table is set out in the top part of the page. Let's look at a partially completed example:

The fields in the Illustration tab are very similar to those in the Policy tab. Their presence reflects the fact that Illustrations can be delivered on bases very different to those in effect with respect to the Policy (e.g., an Illustration might show the Policy as level paying, whereas it might currently pay Face Amount plus Account Value).
| Field Name | Description | Required | Permitted Values |
|---|---|---|---|
| Description | An optional description for the Illustration. | No | Alphanumeric |
| Illustration Date | The date of the Illustration. | Yes | Date |
| Account Value Date | The date as of which the Initial Account Value and the Initial Surrender Value is stated. This defaults to being the same date as the Illustration Date; you will need to look carefully at the Illustration document to check whether they are the same. | Yes | Date |
| Initial Account Value | The balance in the Cash Account as at the Account Value Date. | No | Numeric |
| Initial Surrender Value | The Cash Surrender Value as at the Account Value Date. This is not always stated in the Illustration, so you can either leave this blank or calculate the amount by deducting the Surrender Penalty in effect as of the Account Value Date from the Initial Account Value. | No | Numeric |
| Account Value Basis | The basis of calculation for the Account Value stated in the Illustration. In most cases, this will be the Gross Account Value – however, if the Policy has a Loan outstanding, you will need to determine from the Illustration document whether it is calculated “Gross of Loan” or “Net of Loan” (or “Unknown”). | Yes | Gross Account Value |
| Gross of Loan | |||
| Net of Loan | |||
| Unknown | |||
| Face Amount | The Face Amount stated in the Illustration. | Yes | Numeric |
| Loan Amount | If applicable, the outstanding Loan Amount stated in the Illustration. | No | Numeric |
| Death Benefit Type | The death benefit type which underlies the Illustration. Note that this may differ from the Death Benefit Type currently in effect for the Policy. | Yes | Face Amount plus Account Value |
| Face Amount plus Surrender Value | |||
| Level | |||
| Return of Premium | |||
| Illustration Document | You have the option to attach the Illustration Document to the Illustration. It will appear on the Illustration page and also on the Documents tab for the Case (under the Illustration Documents section). | No | Document |
| Maturity Age | No | Numeric between 90 and 125 | |
| Illustrated Age | This is the basis on which ages are stated in the Illustration document. In most cases, this will be “End of the policy year” – the alternative is “Start of the policy year”. This should be stated in the Illustration – otherwise, in the Policy Form. | Yes | End of the Policy Year (default) |
| Start of the Policy Year | |||
| Is Term Conversion Illustration | This is the end date for the Illustration. Note that this can be different from the Policy Maturity Age (which is the default value, if this is blank in the Illustration). It is essential to get this right as ClariNet LS will extrapolate the COI curve out past the Illustration Maturity Age to the Policy Maturity Age as part of calculating a Premium Schedule if checked, this adds two more fields to the Illustration page: Issue Date of Converted Policy; The Policy Issue Date of the original Policy which gave rise to the conversion and Policy Date of Converted Policy (required): The Policy Date of the original Policy. | No | Checkbox |
| Premiums Paid To Date | The total amount of Premiums paid up to the Account Value Date. This is only used for Policies which have a cumulative Required Annual Premium; otherwise it is captured for information only. | No | Numeric |
| Illustrated Premium Mode | The basis on which premium payments are assumed to be made in the table of values. Illustrations will almost always show annual totals, but they may assume a frequency other than Annual. This will be stated in the Illustration document. | Yes | Annual |
| Monthly | |||
| SemiAnnual | |||
| Quarterly | |||
| Non-Guaranteed Crediting Rate | The current non-guaranteed interest rate credited on the Cash Account. This is usually stated at the top of the table of values. | Yes | Percentage |
| Guaranteed Crediting Rate | The guaranteed minimum crediting rate for the Policy. This is usually stated at the top of the table of values, otherwise it can be found in the Policy Form. | Yes | Percentage |
| Policy Loan Crediting Rate | Relevant only for Illustrations which disclose an outstanding Policy Loan, this is the crediting rate (if any) which is paid on the outstanding Policy Loan balance. It should be stated in the Illustration document. | No | Percentage |
| Policy Loan Accrual Rate | This is the rate at which interest is charged on the outstanding Policy Loan balance. It should be stated in the Illustration document. | No | Percentage |
| RAP Amount | For Policies with a RAP in effect within the Illustration, state the US Dollar amount in this field. This will be shown in the Illustration document and in the Policy Schedule. | No | Numeric |
| RAP Number of Years | The number of Policy Years (after the Policy Date) for which the RAP is in effect. | No | Numeric |
| RAP is Cumulative | If checked, this indicates that the RAP can be satisfied by paying the total over the Number of Years, rather than requiring that the RAP be satisfied in each Policy Year independently. This can be found in the Policy Form and possibly in the Illustration document. If unsure, leave this unchecked. | No | Checkbox |
| First Premium is Annualized | The default value is checked as the first premium shown in the majority of Illustration tables is annualized (i.e., spread across the whole of that Policy Year). This information can be found in the Illustration document. If in doubt, comparing the Initial Account Value to the illustrated Account Value at the end of the current Policy Year, then deducting the known monthly charges over the intervening period, should indicate whether the first premium is annualized or not. | No | Checkbox (default: Yes) |
| Loan Repayment Date | Where the Illustration incorporates the repayment of a Policy loan, specify the date as of which the illustration assumes repayment of the Policy loan. | No | Date |
| Loan Repayment Amount | The amount of the Policy loan being repaid. Note that this should not exceed the Loan Amount stated above. | No | Numeric |
| Cash Withdrawal | Cash Withdrawal Date: The date as of which the cash withdrawal is assumed to be made; Cash Withdrawal Amount: The amount of the cash withdrawal. Surrender Charge Type: This is a required value. Options are: None, Per Unit of Account Value, Per Unit of Face Amount, User Specified. If User Specified is selected, a further field labelled "User Defined Amount" is displayed. NDB Includes Surrender Charge: This checkbox specifies whether the NDB is expressed net of the surrender charge associated with the withdrawal. | No | Checkbox |
Entering the Table of Values
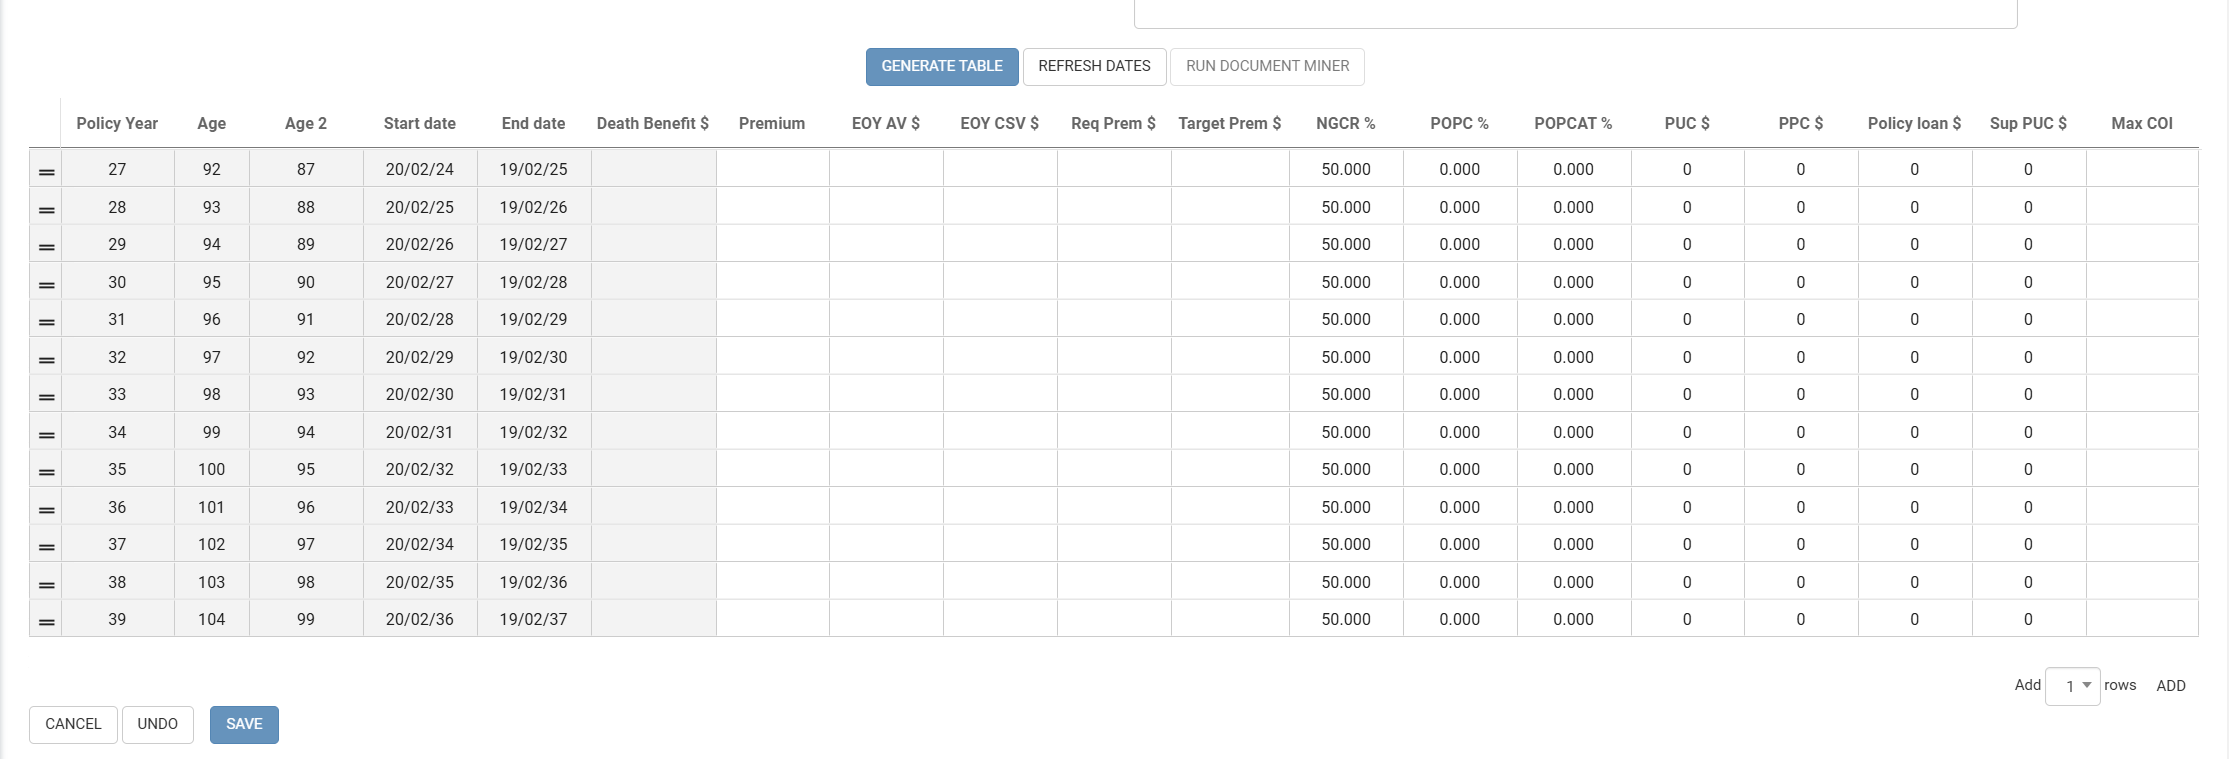
Once you have entered all of the required information in the first half of the Illustrations tab, clicking Generate Table builds the table of values.

ClariNet LS uses the values entered in the first half of the tab to generate the default values for Policy Year, Age, Start Date, End Date and NGCR. It uses the values entered in the Policy tab to generate the default values for POPC, POPCAT, PUC and PPC.
The column headings are:
| Heading | Description | Permitted Values |
|---|---|---|
| Policy Year | The Policy Year relevant to the stated cashflows. Note that this starts from the Policy Year in which the Account Value Date falls. | System Generated |
| Age | The Age of the Insured(s) at the start or end of the Policy Year (depending on the setting in Illustrated Age). | System Generated |
| Start Date | The start of the Policy Year (generated from the Policy Date on the Policy tab). | System Generated |
| End Date | The end of the Policy Year (generated from the Policy Date on the Policy tab). | System Generated |
| Death Benefit $ | The Net Death Benefit in effect during that Policy Year. For Policies with Death benefit Type set to Level, this will be the same amount throughout the table. For all other Policies, this field is inactive as the Death Benefit will be calculated based on the Face Amount. | Numeric |
| Premium $ | The illustrated premium payable during that Policy Year. | Numeric |
| EOY AV $ | The illustrated Account Value as at the end of that Policy Year, assuming payment of the Premium. | Numeric |
| EOY CSV $ | The illustrated Cash Surrender Value as at the end of that Policy Year. Note that this equals the Account Value in the previous column minus the Surrender Charge applicable to that Policy Year. | Numeric |
| Req Prem $ | The Required Annual Premium payable in that Policy Year. This is pre-populated based on the RAP Amount and RAP Number of Years stated in top part of the page. | Numeric |
| Target Prem $ | If there is a Target Premium in effect for the Policy in the Policy Year, enter it here. This information will be found in the Illustration document and the Policy Form. | Numeric |
| NGCR % | The Non-Guaranteed Crediting Rate expressed as a percentage which is in effect in that Policy Year. The default values are set from the entry in the top part of the page. Note that this value can change during the life of the Policy, so it is important to check that the values in each Policy Year match those set out in the Illustration document. | Percentage |
| POPC % | The Percent of Premium Charge applicable during that Policy Year. All of the Policy loads can change over time, so it is important to check the values shown in the Illustration document and the Policy Form. | Percentage |
| POPCAT % | Percent of Premium Charge Above Target. Only relevant if there is a Target Premium specified. | Percentage |
| PUC $ | Per Unit Charge, expressed in US Dollars per US$1,000 of Face Amount. Note that the PUC frequency is set on the Policy tab and can be found in the data pages in the Policy document. | Numeric |
| PPC $ | Per Policy Charge. Note that the PPC frequency is set on the Policy tab and can be found in the data pages in the Policy document. | Numeric |
| Policy Loan $ | The outstanding Policy Loan balance at the end of that Policy Year. | Numeric |
| Dividend $ | Relevant for Policies with a participating feature (i.e., where all or part of the income is indexed to the performance of the Carrier’s shares), this is the amount of dividend which is assumed to be credited to the Cash Account during that Policy Year. | Numeric |
With the table generated, you can go through and enter the values from the table of values in the Illustration document.

Enter the values in the table as shown in the Illustration document, paying particular attention to the Policy Year – some illustrations will omit the current Policy Year from the table, merely stating the Account Value as of the end of the current Policy Year. You can also copy and paste data from an Excel sheet straight into the columns in the Illustration table.
Data Entry Tools
There are several tools included in ClariNet LS to simplify data entry and reduce errors:


You will notice a small blue square (as shown in the picture above) at the lower right corner of every numeric entry in the editable columns. This is a “copy and drag” tool, which allows you to copy the value shown in that cell across other cells in the table, both down and across. The blue square appears on every cell which is active for data entry.
Saving the completed Illustration
Once the table of values has been entered into the page, click Save. This returns you to the Case Summary with the Illustrations tab displayed showing the new Illustration:

Editing an Illustration
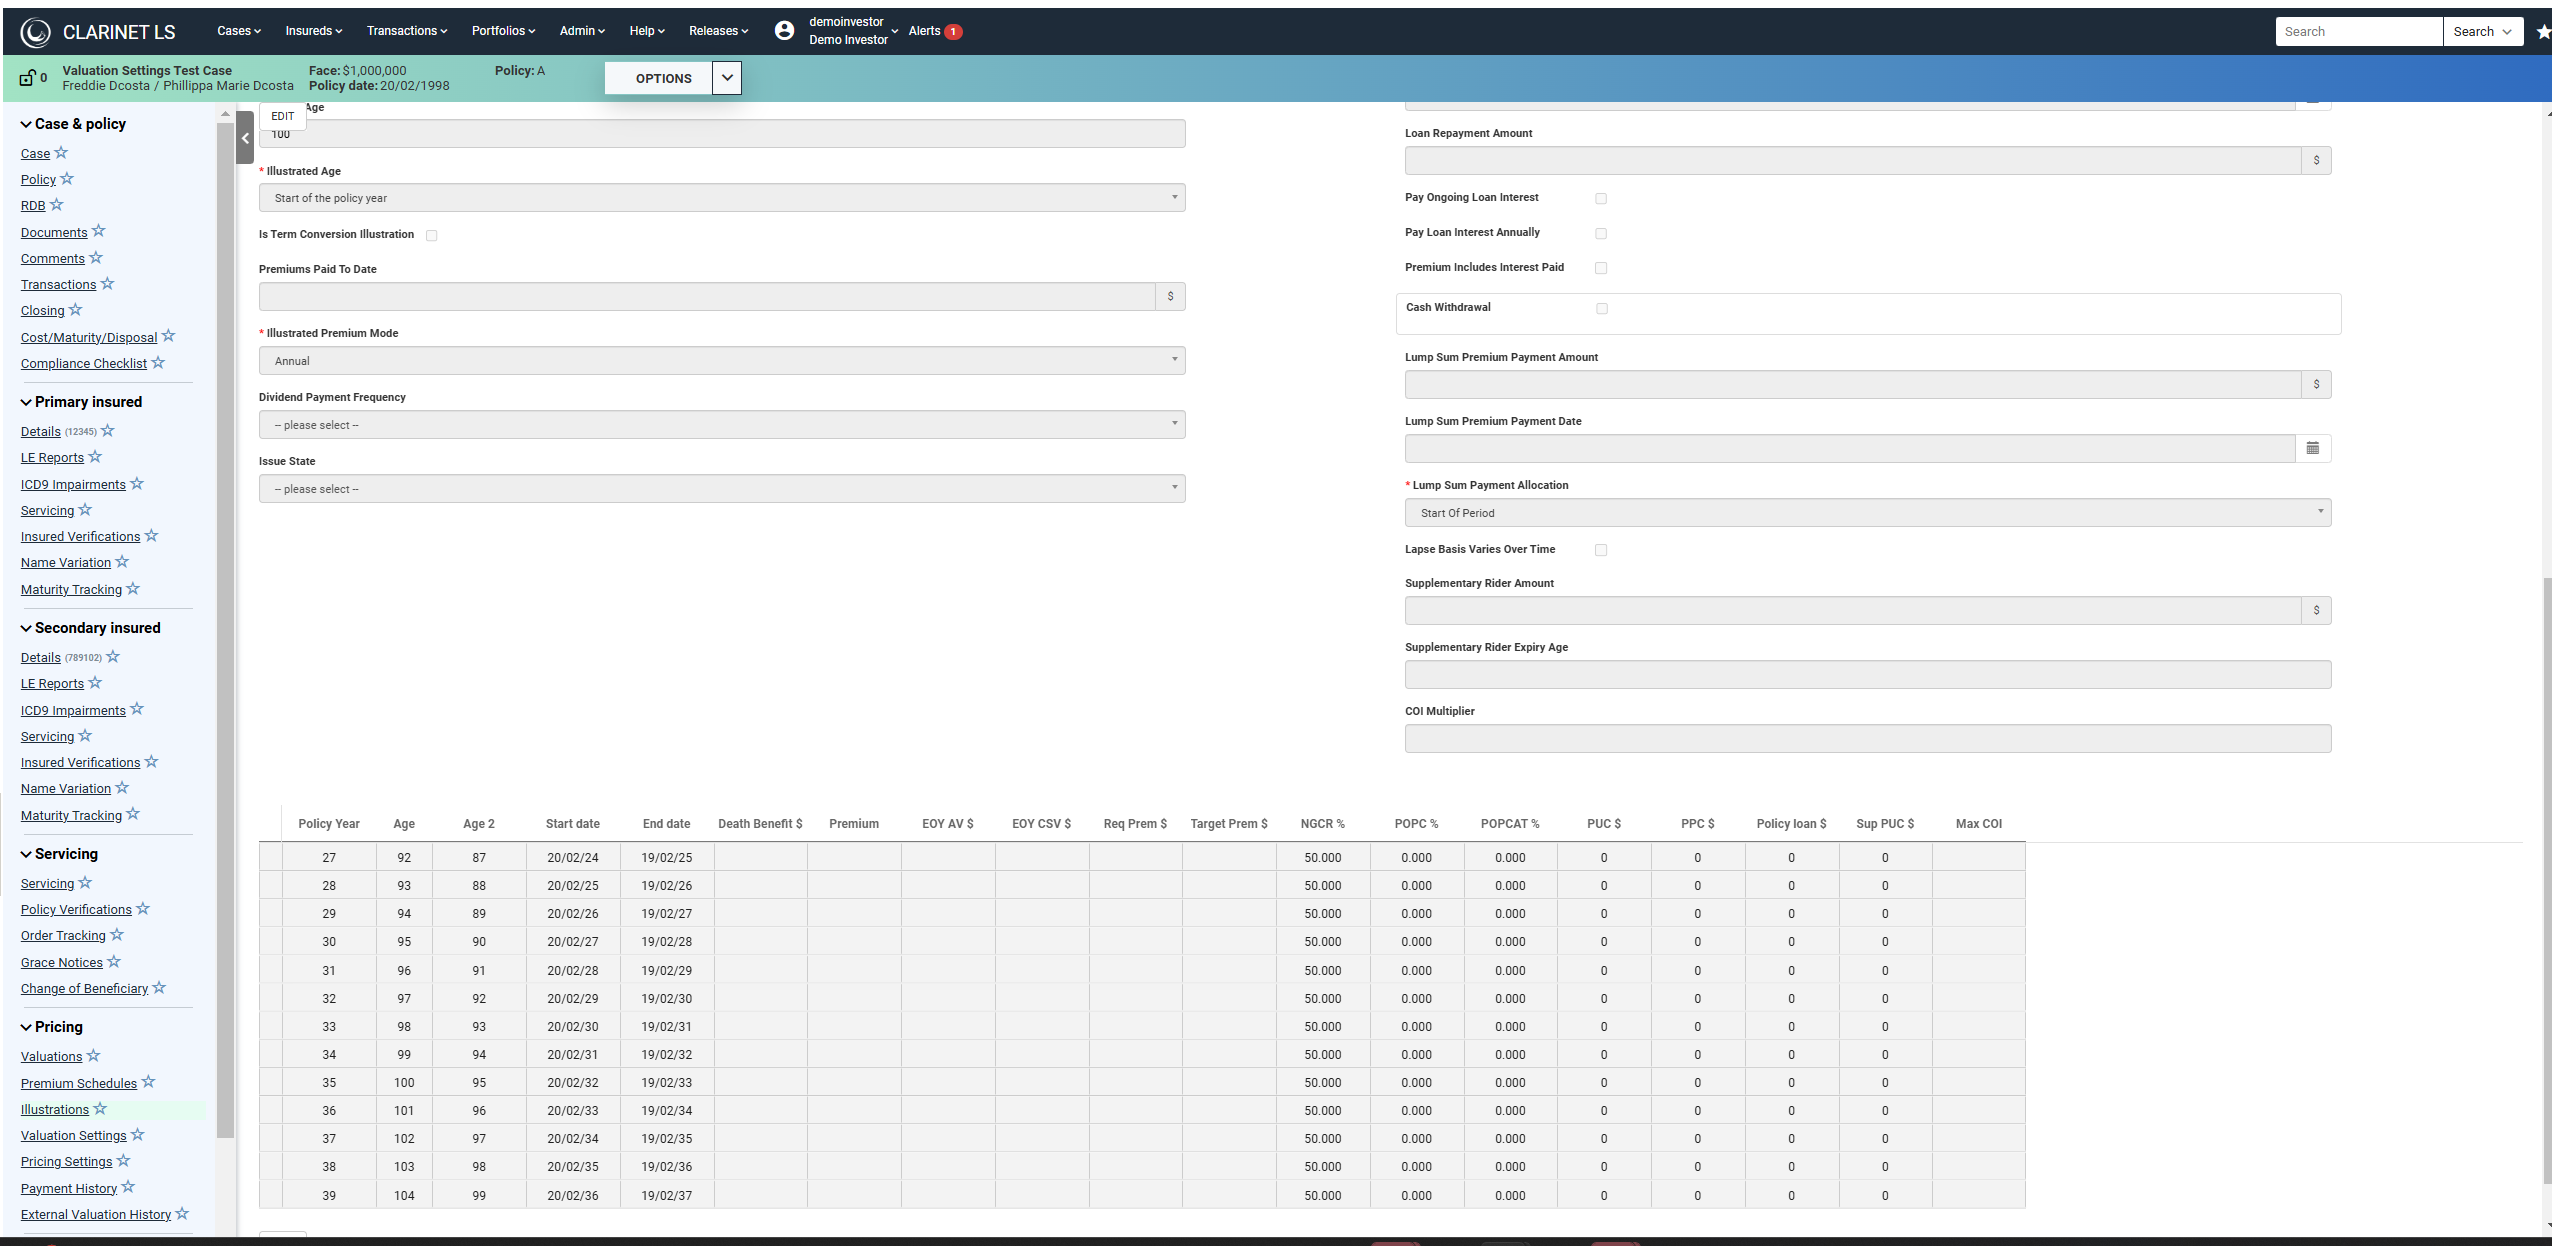
Should you need to edit an Illustration, click on the View icon next to the Illustration on the Illustrations tab. This will open the Illustration page in View mode. From there, you can click the Edit icon to edit the Illustration. Note that editing an Illustration will cause any calculated Premium Schedules which have been derived from that Illustration to be deleted.
