Document Service Integrations
A document service integration defines how ClariNet matches files from your document source to the correct Cases and Insureds within a Portfolio.
It can be configured to:
- Match files using identifiers such as case references, policy numbers in ClariNet to words in the file path.
- Detect keywords to determine the document type and assign it appropriately within ClariNet.
- Ignore files based on specific keywords in their folder path or filename.
You can also setup a schedule for the integration to run automatically, ensuring your documents stay in sync without manual intervention.
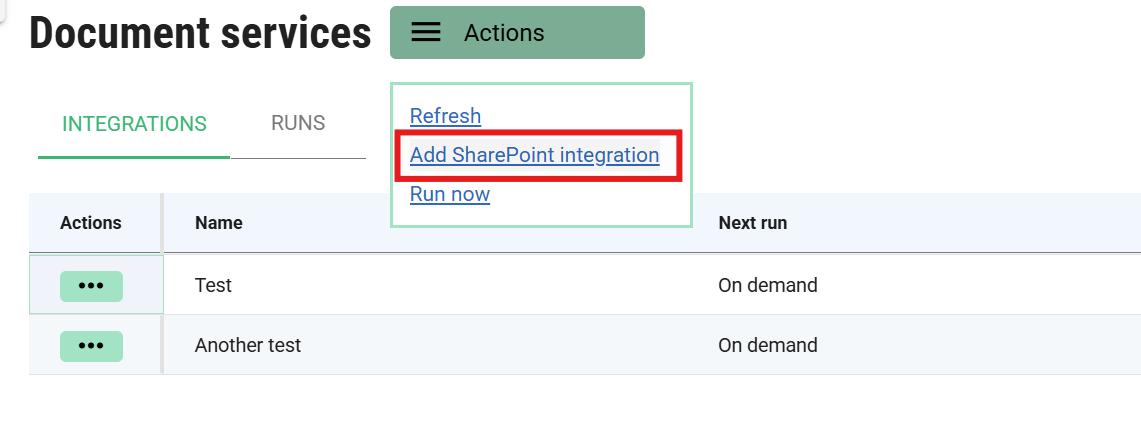
Setting up a new Integration
Once you have created a connection, you can set up integrations that use it by navigating to the portfolio they should be attached to.
To see this tab you will need the Portfolio Management → Document Services Read permission to view, please contact your subscriber administrator to get this.
Once on this tab, you can add a new integration using the Actions menu at the top of the tab.
Create SharePoint Integration
The following information needs to be filled in for a SharePoint integration.
| Field | Description |
|---|---|
| Integration name | This is your own reference used to identify the integration in various places in ClariNet. |
| SharePoint connection | The SharePoint connection, as defined in Document Service Connections , that tells ClariNet how to connect to your SharePoint. |
| Document library name | Within SharePoint, the top level Document library used for this integration. The credentials ClariNet is using must have permission to read from this Document library. |
| Search identifiers | These are the identifiers ClariNet will use to match files from SharePoint to Cases or Insureds in ClariNet. You must select at least one. |
| Document type mappings | These are mappings from keywords in the full file path to Document types to use in ClariNet when importing documents. For example, if the file includes “Policy”, you might want to map that to “Policy Form”. These will be set as indicative document types. |
| Ignore mappings | These are keywords in the full file path that tell ClariNet to ignore matching files. For example, you could add “readme” to ignore all files containing that in their path or name, even if they would otherwise match. |
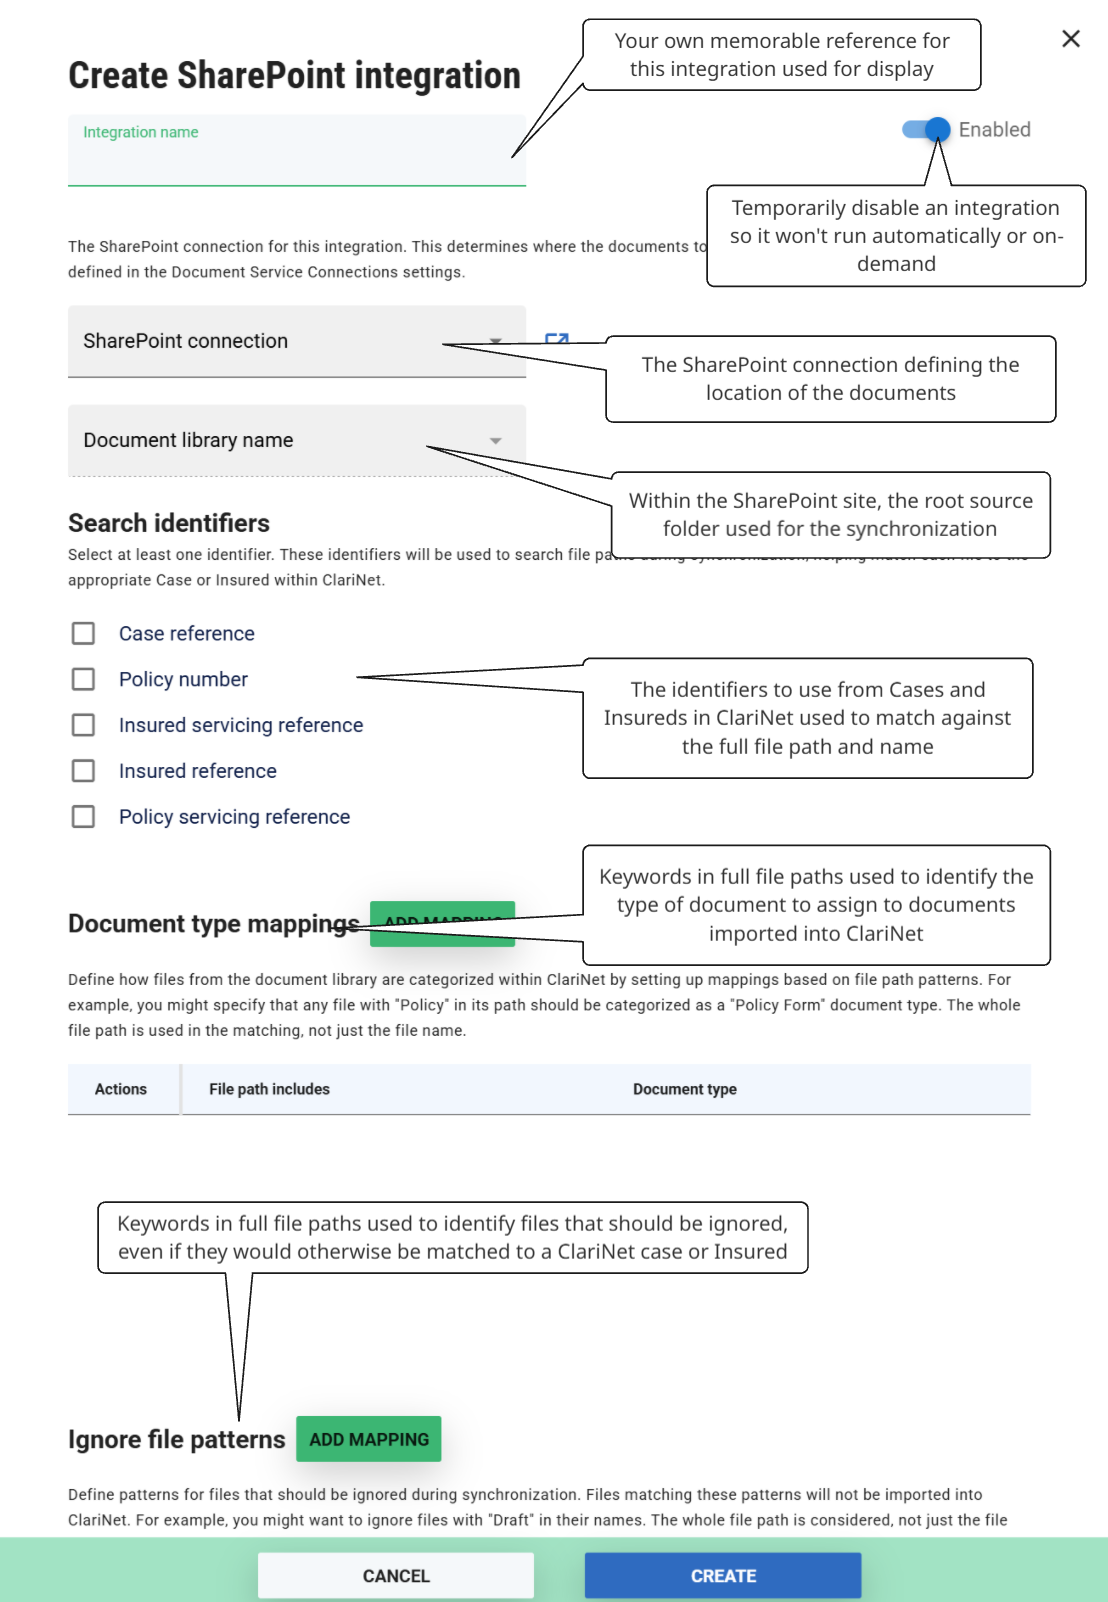
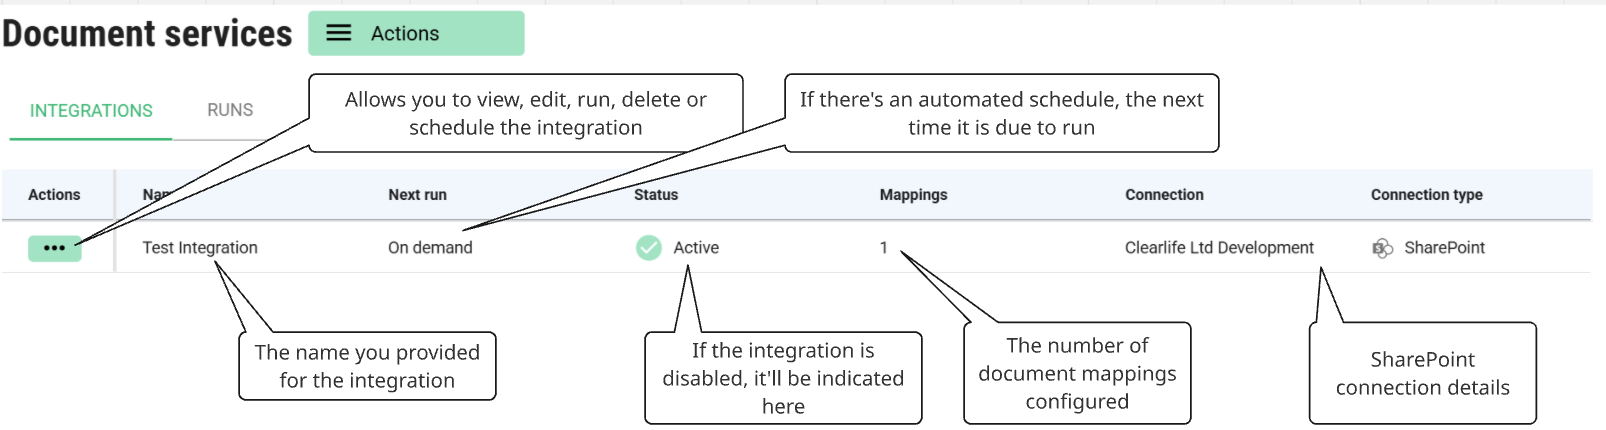
Once filled out, click the “CREATE” button to save the integration and it will appear in the list as below. It won’t run automatically or otherwise until you create a schedule for it in another step, or manually trigger it when you’re ready to do so.
How file matching works
ClariNet matches source files to entities—such as Cases or Insureds—based on the Search Identifiers you've selected (e.g. Case Reference, Policy Number, Policy Servicing Reference).
For each selected identifier, ClariNet gathers a list of references from the Portfolio associated with the integration. For example, if the Case references in your Portfolio are:
json
CASEREF001
CASEREF002
CASEREF003
And your SharePoint files include:
json
CASEREF001/Policy.pdf

CASEREF001/LE.pdf

CASEREF002/Policy.pdf

CASEREF004/LE.pdf
ClariNet will:
- Match the first two files to CASEREF001
- Match the third file to CASEREF002
- Ignore the fourth file (CASEREF004) since it doesn’t match any known reference
Matching and Mapping Principles
- Path based - Matching considers the full file path - not just the file name.
- Case-insensitive - For example,
caseref001/policy.pdfwill match just likeCASEREF001/Policy.pdf - Consistent logic: These principles apply to file matching, document type mapping and ignore pattern rules.
Scheduling
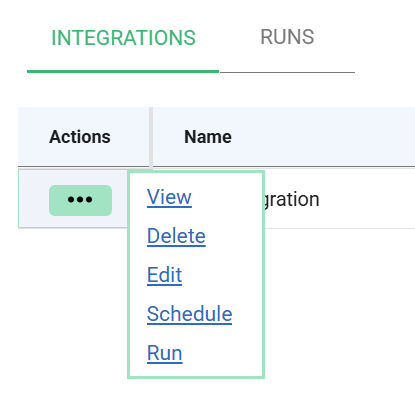
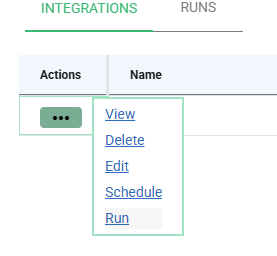
To setup an automatic schedule for an integration, click on the actions menu button from the list of integrations as below, and select “Schedule”:
This will bring out the following dialog. To define when the integration runs, you need to define a Cron Schedule. This is a essentially some text that specifies a fixed time, interval or frequency at which to run. The dialog has some example Cron expressions; clicking on the calendar icon will pre-populate them for you.
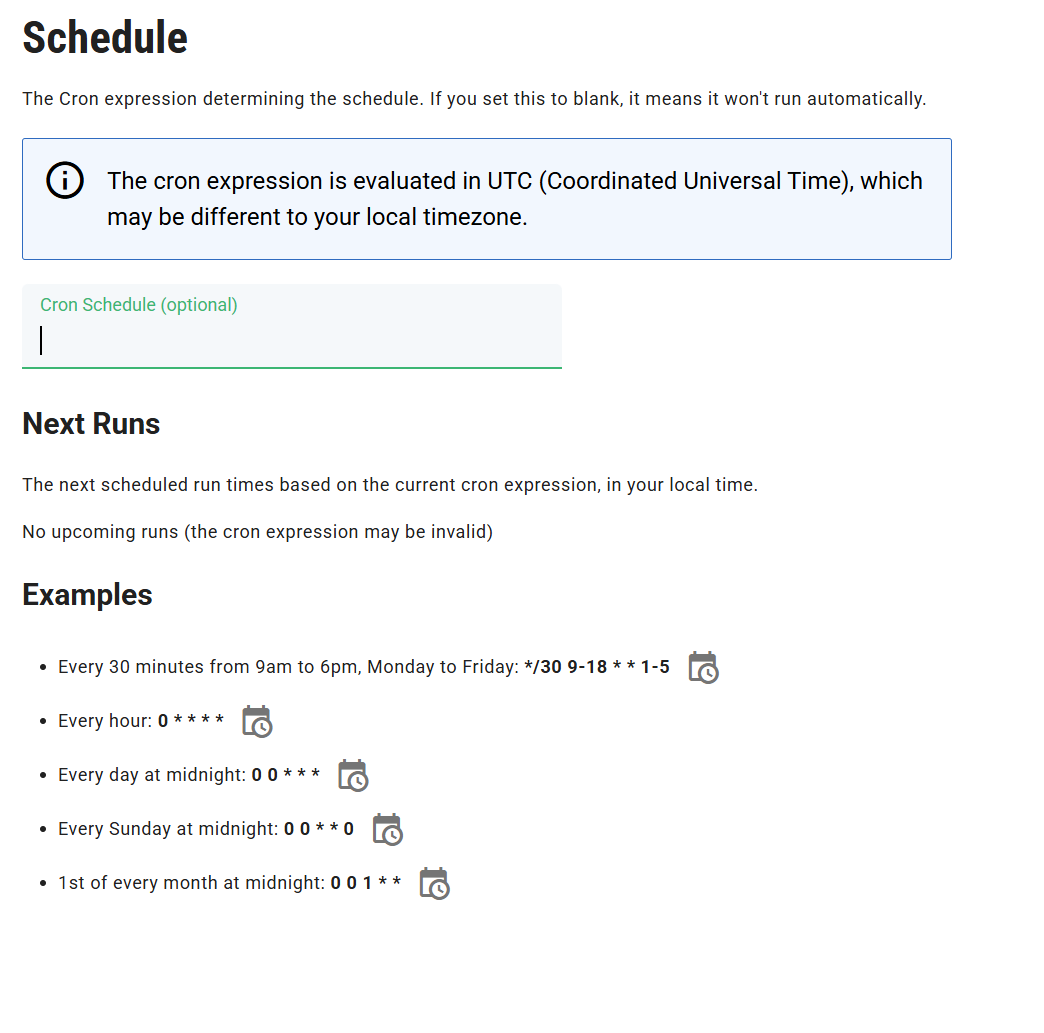
Generating a Cron expression
The Cron expression is made of five fields. Each field can have the following values.
| * | * | * | * | * |
|---|---|---|---|---|
| minute (0-59) | hour (0 - 23) | day of the month (1 - 31) | month (1 - 12) | day of the week (0 - 6) |
ClariNet evaluates Cron expressions in UTC (Coordinated Universal Time), so be sure to convert any local time requirements accordingly.
If you're unsure how to define a suitable expression, feel free to contact Support - this is a technical task and we’re happy to assist. You can also use online tools (search for “Cron Expression Generator”) or ask an AI assistant like Copilot, ChatGPT, or Gemini to help you craft one.
Here’s an example prompt you can use with an AI tool:
“Can you give me a Cron expression that runs every 45 minutes between 9am and 6pm Eastern Standard Time (EST), Monday to Friday? Note: the Cron expression will be evaluated in UTC.”
AI tools occasionally make mistakes. Once you’ve entered the Cron expression into ClariNet, a list of the next run times using that expression will be given to you in your local time , so you’ll be able to verify that it matches your expectations.
On-demand running
You can also run an integration “on-demand”. You can do this from the main Document Services tab on the Portfolio page, on the “Integrations” tab.
To run a specific integration, click on the actions menu for that integration in the table as below. You’ll be able to see “Run” as long as:
- You have the “Edit” permissions
- The integration isn’t disabled
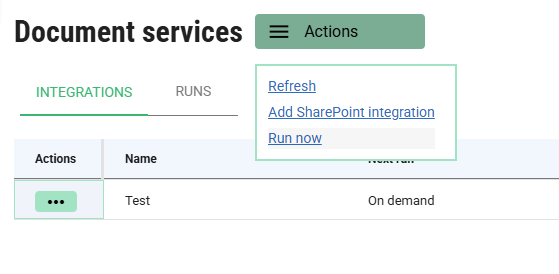
If you wish to run all the integrations for a Portfolio, assuming you have multiple defined, then you can do so from the “Actions” button at the top of the Document service tab:
Runs
A run refers to a single execution of ClariNet’s integration process. During a run, ClariNet scans the files available on your connected document service (such as SharePoint), applies the matching rules defined in your integration, and links those files to the appropriate Cases and Insureds. Once matched, the files are uploaded to ClariNet as Documents.
You can view a history of all runs - whether triggered manually, via the public API, or through an automated schedule - by navigating to the Document Services tab and selecting the Runs sub-tab.
When you initiate an integration manually, you’ll be presented with a prompt as below that includes two optional settings:
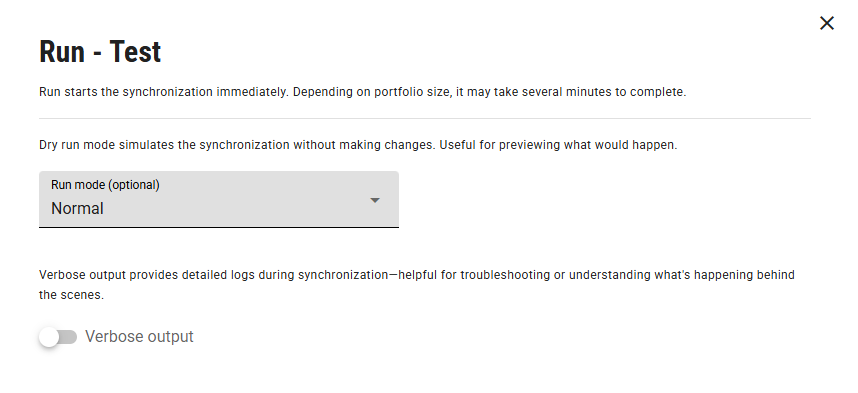
There are a couple of options here you can change (both optional).
- Run mode Choose between:
Dry run: Simulates the process without making any changes in ClariNet. It identifies which files would be matched and uploaded, allowing you to safely test new or updated integration rules.
Normal: Executes the full process, matching and uploading documents as defined.
- Verbose output Enables detailed logging during the run. This can be helpful for troubleshooting or understanding why certain files weren’t matched. Support may request this setting when diagnosing issues.
If you’re ready to proceed without changing any options, simply click the RUN button at the bottom to begin.
Once a run begins, within several seconds it should appear on the Runs tab as below.

| Column | Description |
|---|---|
| Actions | Provides specific actions for the given run, in this case the option to view the actions that were taken by it. |
| Integration | The name of the integration that was performed by this run. |
| Started | The time (in your local time) that the run started. |
| Finished | If it has finished, the time at which it finished. |
| Status | This can be: In Progress - meaning that the process is still ongoing, it is currently iterating through files, matching to ClariNet Cases and adding documents. Failed - something unexpected went wrong and the process crashed. You’ll probably need to contact support to investigate this. Completed - the process completed without any catastrophic errors. |
| Mode | This can be: Live - the process is allowed to make changes (i.e. add documents) in ClariNet on your behalf. Dry Run - the process is matching the files to ClariNet Cases and Insureds, but won’t upload any documents. |
| Documents added | The number of documents this run created in ClariNet |
| Match errors | The number of match errors encountered. If no match was found, this is not counted as an error - a match error describes more nuanced problems, such as a particular match being ambiguous and matching to multiple different Cases within the Portfolio. |
Run actions
When a run performs a meaningful task—such as matching a file to a ClariNet Case or Insured, and if applicable, uploading it as a Document—it generates a Run Action.
You can view these actions by clicking on any Run listed in the Runs tab under Document Services. The resulting view displays a breakdown of what occurred during that run. Here's an example.
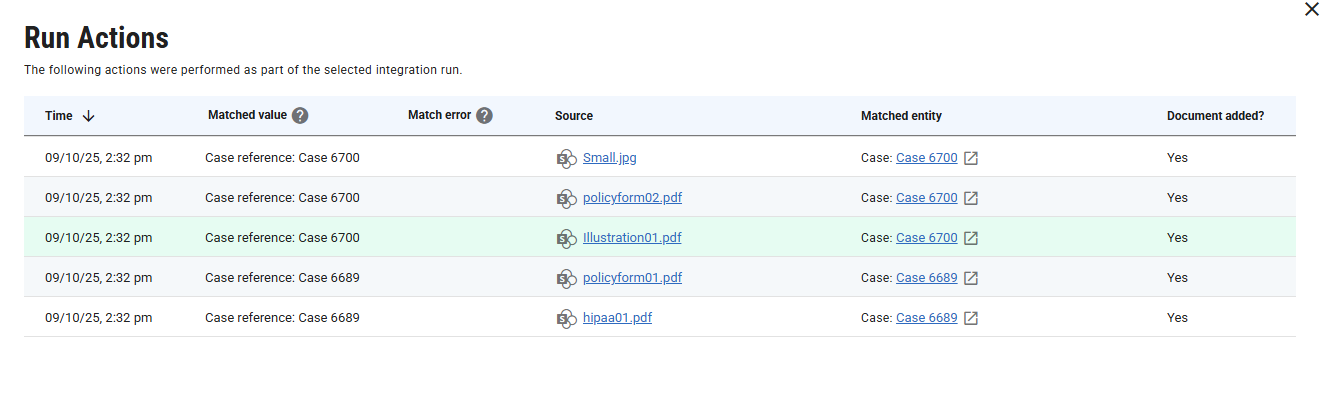
Take the first row in the example above:
It shows that the SharePoint file Small.jpg was matched to Case 6700 in ClariNet, and a document was created on that Case as a result.
- Clicking Small.jpg opens the SharePoint folder containing the file (you’ll need to be logged into SharePoint to access it).
- Hovering over the filename reveals the full file path—useful for understanding how the match was made, especially if the matched reference appears in the path rather than the filename
Column Definitions
- Matched Value Displays the type of reference used for matching (e.g., Case reference, Policy number) and the specific value that triggered the match.
- Matched Error Populated when the match encounters an issue—such as matching to multiple Cases—which may require review.
- Matched Entity A direct link to the matched Case or Insured in ClariNet. Clicking it opens the Case view or performs a search for the Insured.
- Document Added Indicates whether the matched file was uploaded as a document. If the match was successful and the run was not a dry run, this will show Yes.