
Overview
Export Templates allow you to export data from ClariNet into customized formats while giving you full control over layout and styling. You can create templates using Excel spreadsheets, Word documents, or plain text files.
Templates connect to ClariNet data using Tags. These tags can insert specific data fields (such as Policy Number or Face Amount) or use simple expressions to format and control how your data is displayed.
Input & output formats
ClariNet supports three template file formats, allowing you to choose the right medium for your reporting needs:
- Excel (
.xlsx): Ideal for standard financial reporting, data analysis, and tabular lists where you need built-in calculation functions and formatted grids. You can export these as PDFs, images, and more. - Word (
.docx): Designed for formal correspondence, letters, and narrative-heavy documents requiring explicit document layout and styling. - Plain Text (
.txt,.json,.csv): Useful for generating structured data outputs to integrate ClariNet with third-party software or external systems using custom file formats.
Running a Template
Export templates support three primary modes of operation depending on your output needs:
- Single Case Export Use this mode to generate a report or document for an individual case (such as printing a single policy letter).
- Setting: Select Show for case export
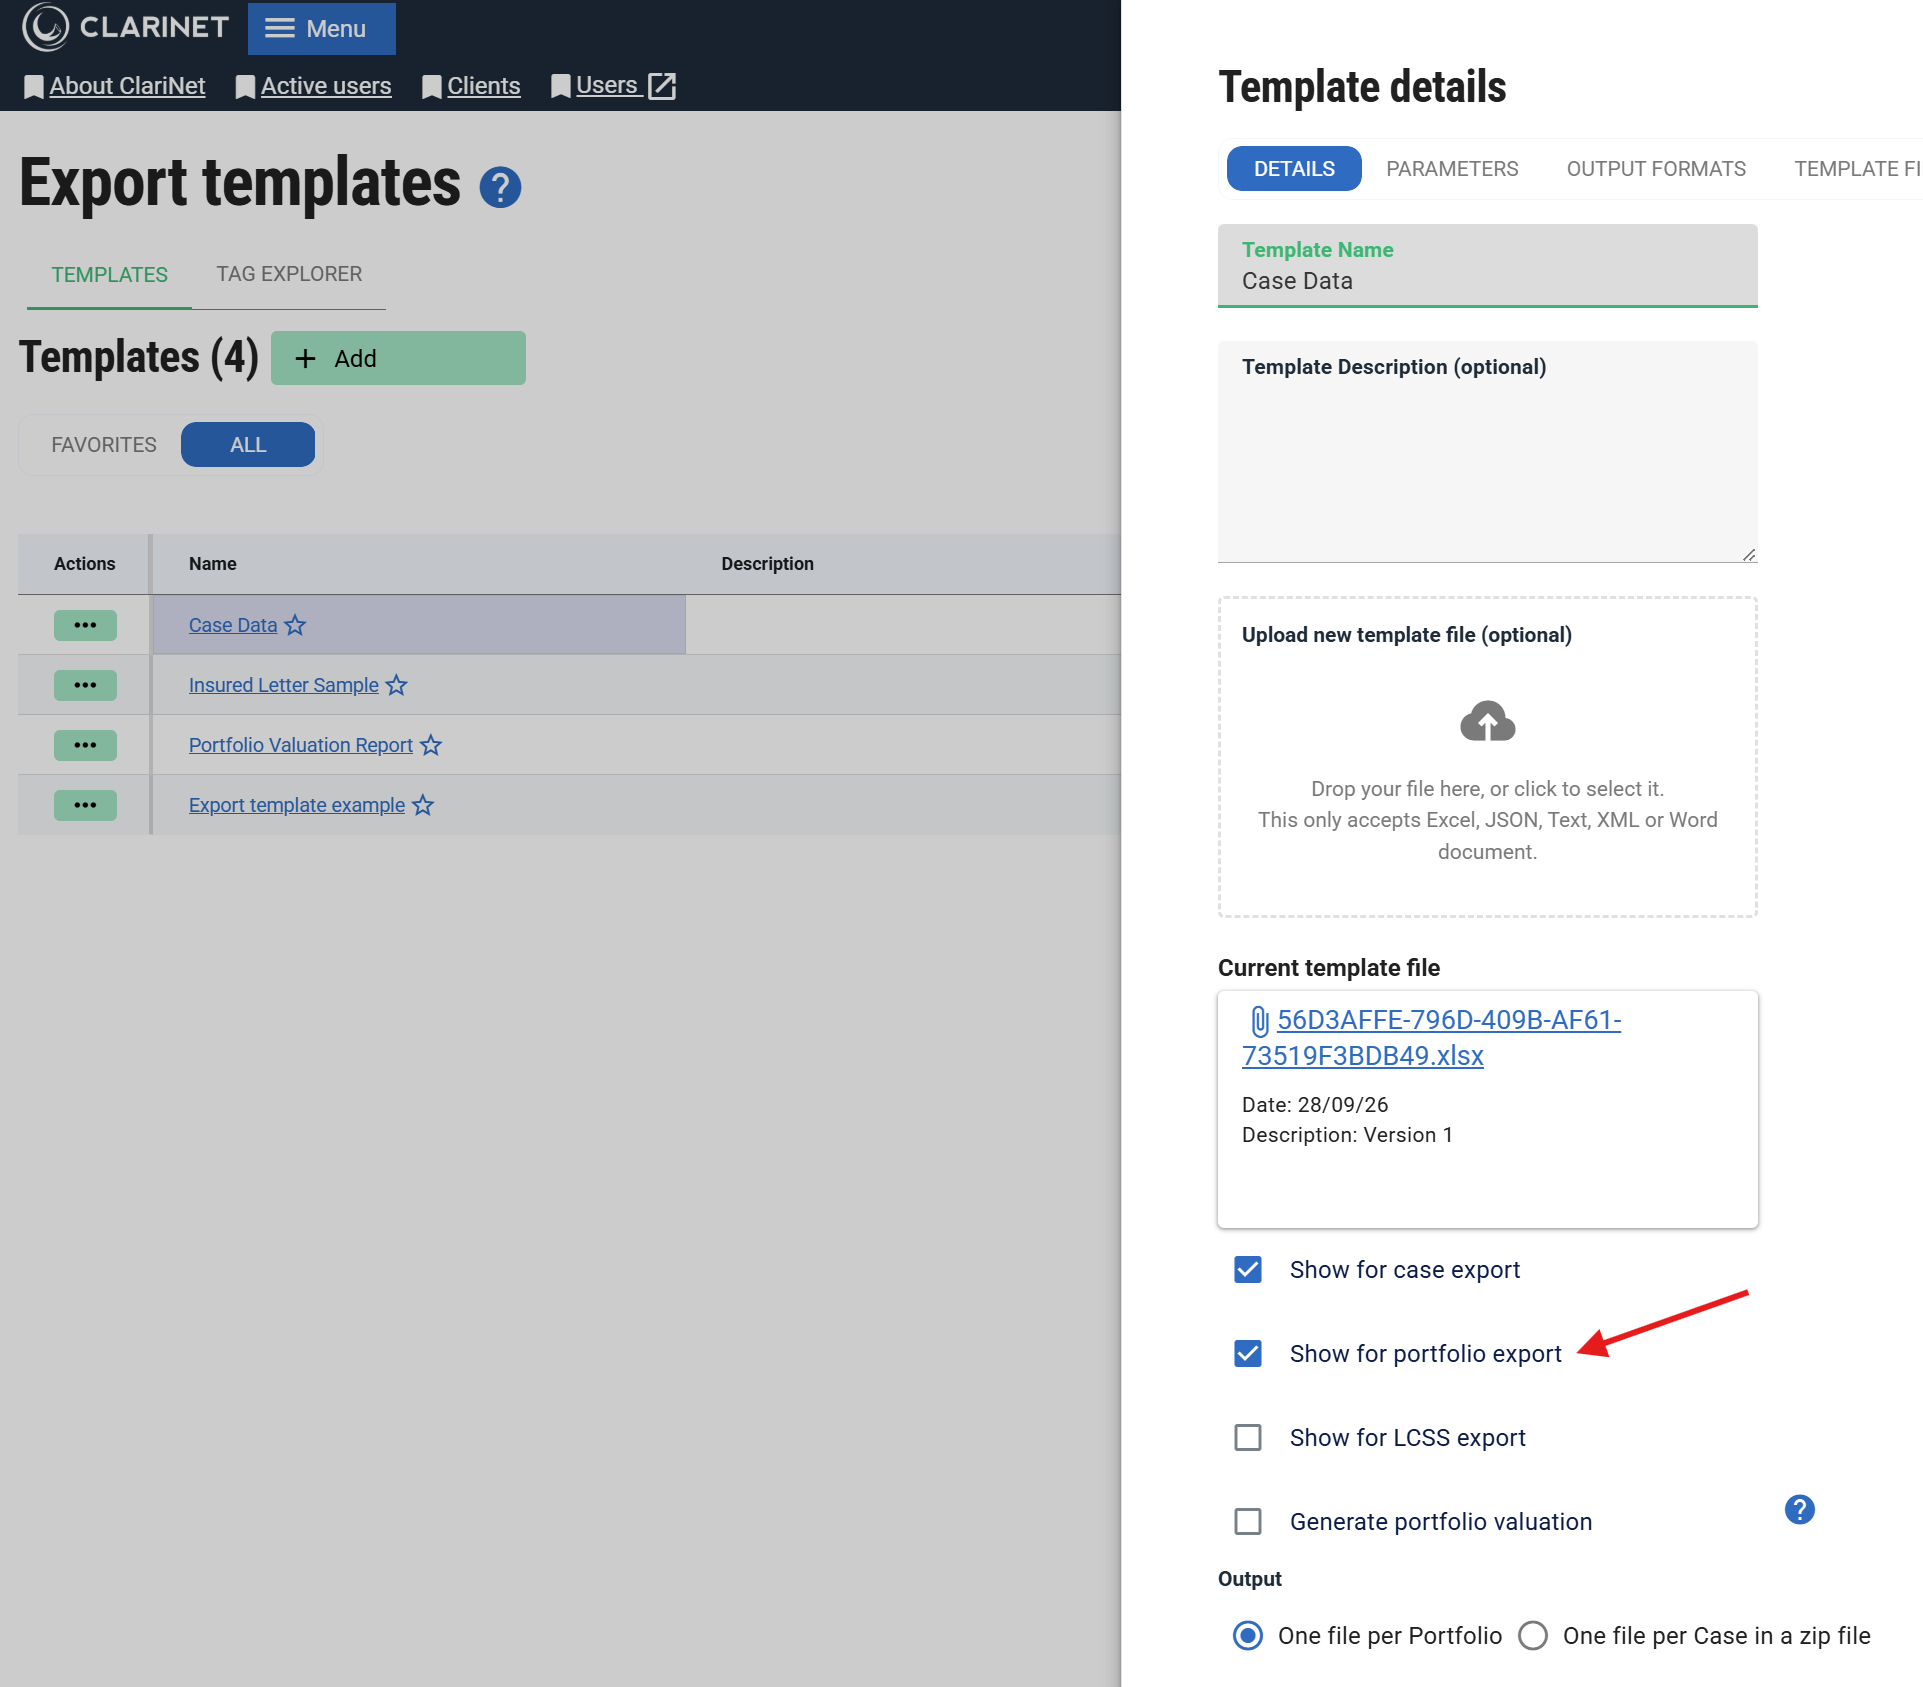
- Aggregated Portfolio Export Use this mode to consolidate data across multiple cases into a single spreadsheet, for example, generating an Excel inventory list of face amounts or calculating summary statistics (like sums or averages) across a search result.
- Setting: Build the template operating over
$Casesand select Show for portfolio export.
- Setting: Build the template operating over
- Batch Export (Mail Merge) Use this mode to generate individual files for multiple cases at once - similar to a mail merge (for example, sending personalized letters to insureds across a set of cases). Design the template as if it were for a single case, and ClariNet will generate a separate file for each case.
- Settings: Enable both Show for case export and Show for portfolio export. Set the Output option to One file per Case in a zip file. The final download will be a ZIP archive containing individual files (
.xlsx,.docx,.pdf, etc.).
- Settings: Enable both Show for case export and Show for portfolio export. Set the Output option to One file per Case in a zip file. The final download will be a ZIP archive containing individual files (
Case Export
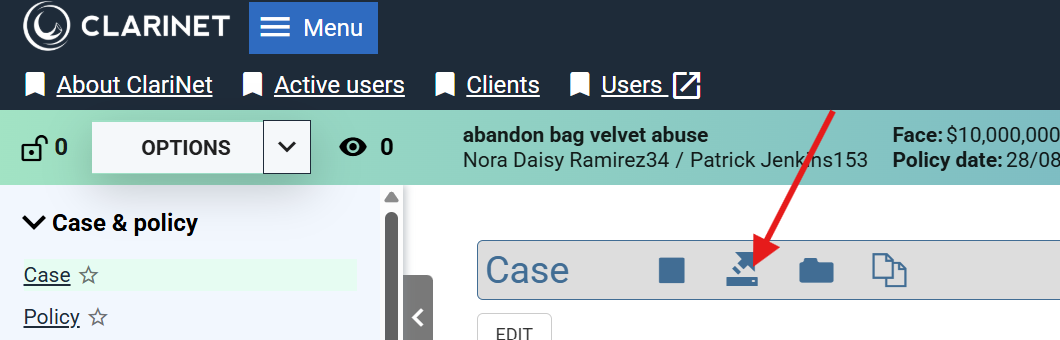
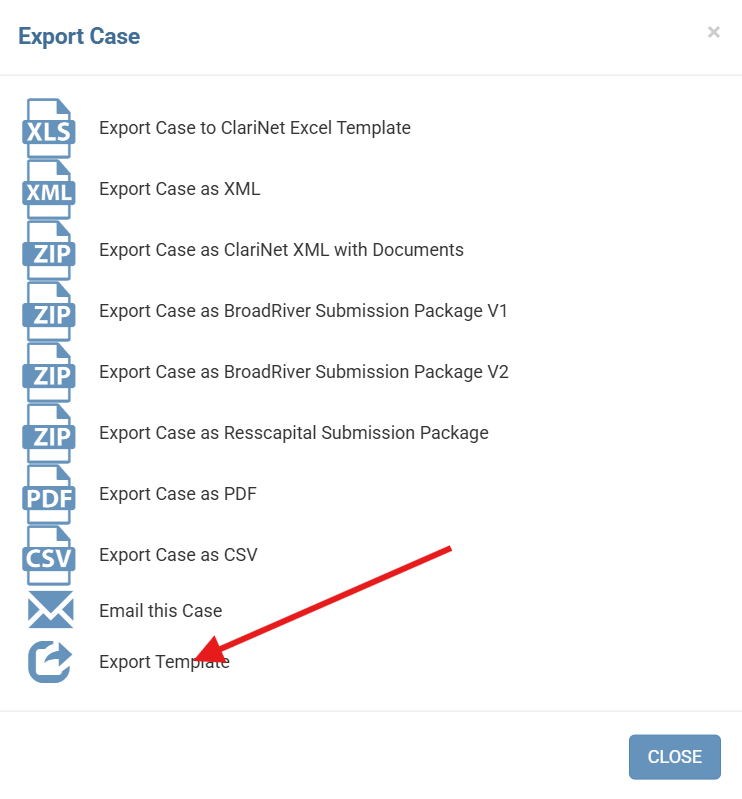
You can run export templates on individual cases directly from the Case List or a specific Case Page.
The export action will only be visible if you have active templates in Settings → Export Templates with Show for case export selected.
Locate the case, open the Export menu, and select your template to generate the document.
Portfolio Export
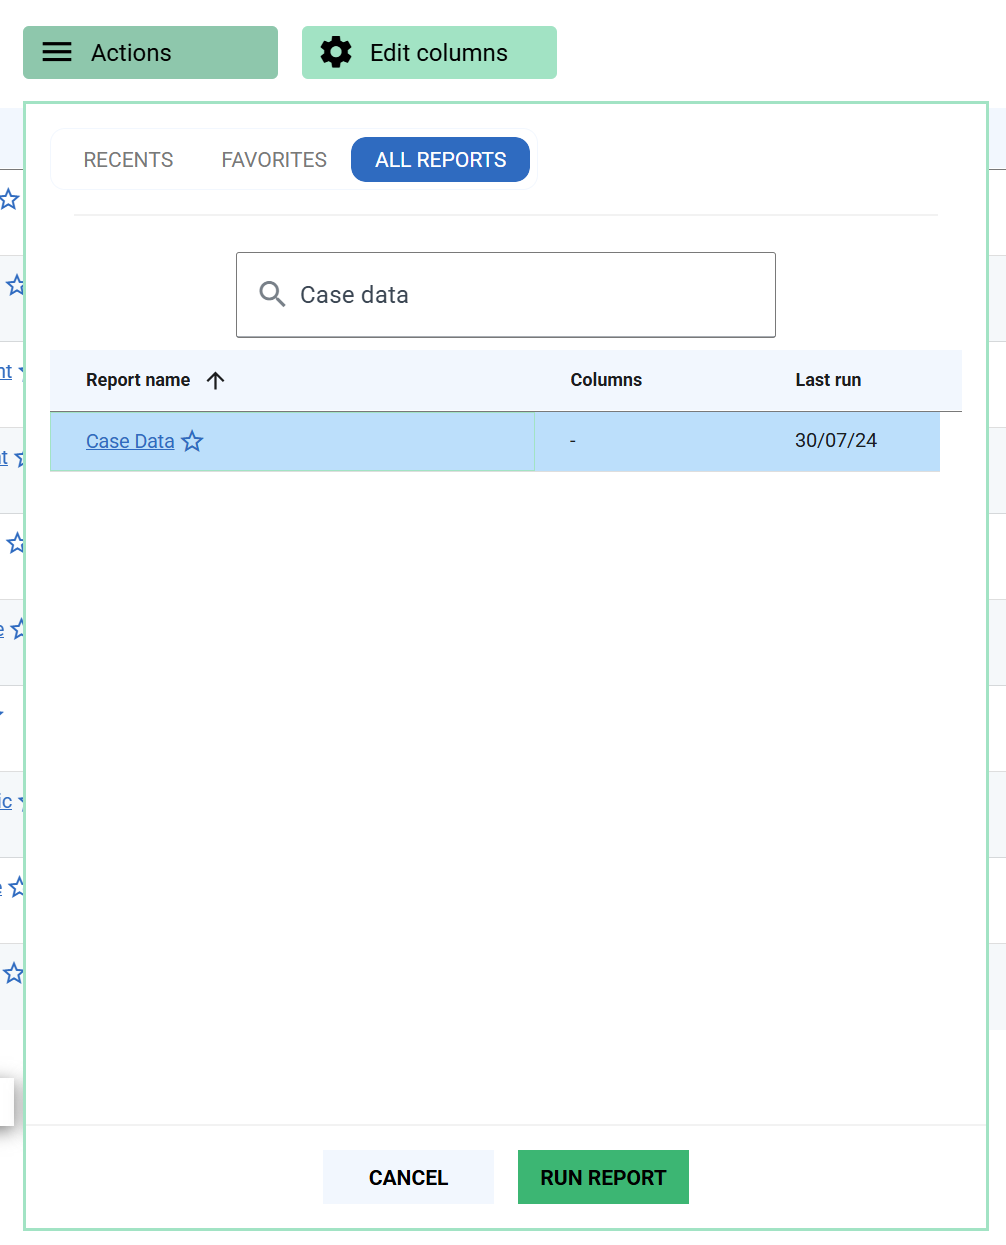
You can run export templates templates for a Portfolio from the reporting tab.
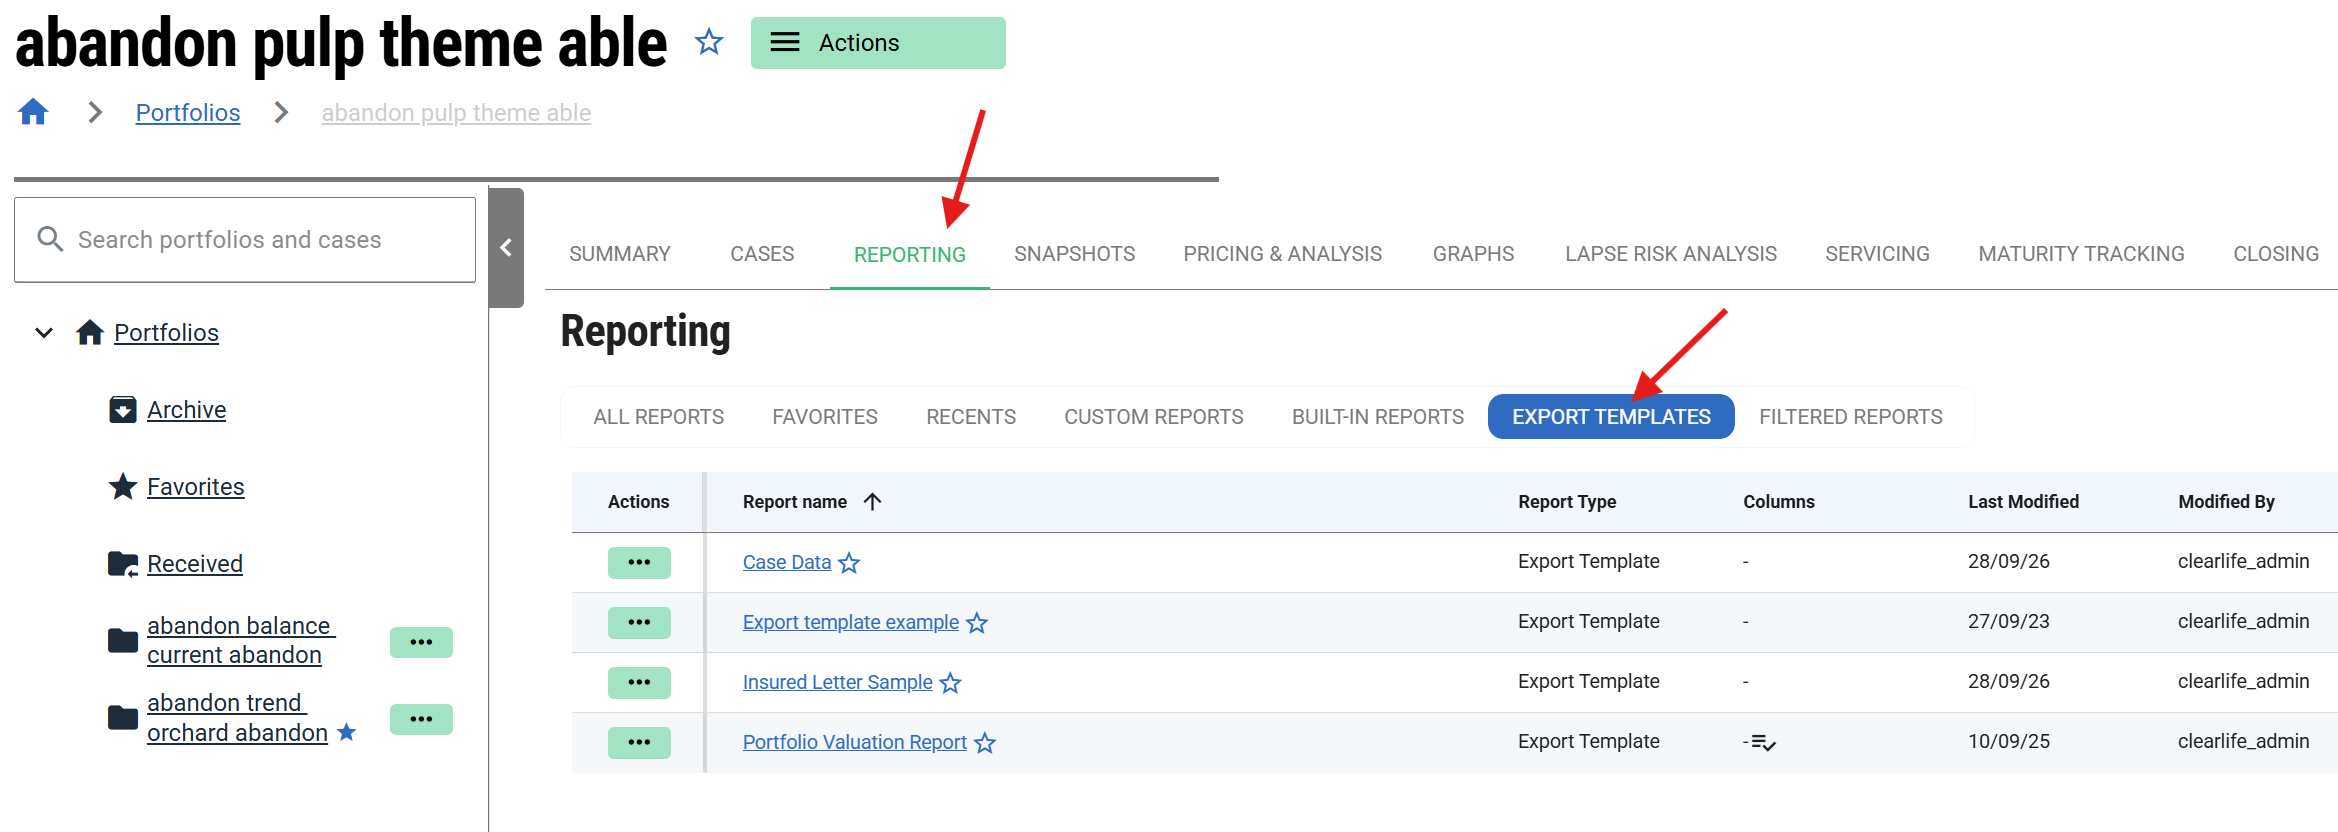
This also works for Case lists and Searches. You will only see this if there are Export templates defined that have the Show for Portfolio option selected.
You can run templates from case lists on the home page or search results. Click on the Actions button, locate your template, then click Run report, or click on the link.
Managing and creating templates
You can create and manage your templates by navigating to Settings → Export Templates in the top menu.

The Export Templates interface is split into two primary tabs:
- Templates Tab: Upload, configure, and manage your template files (
.xlsx,.docx,.txt, etc.). Here you can assign template titles, select data entities, and configure export options (such as Show for case export or Show for portfolio export). - Tag Explorer Tab: A built-in development environment designed to help you construct and test templates. It includes:
- Tag Search & Browser: Search and inspect available data fields (e.g., Policy Number, Face Amount) across the data model.
- Function Reference: Access a quick reference guide for formatting and logic functions.
- Scratch Pad: Write and test simple template expressions directly in the browser to preview their output before adding them to your official templates.
Templates
The Templates tab in the Export Templates settings page allows you to view and manage all existing templates on your account.
Previewing and Running Templates
As you build out new templates, you can test them directly on a specific Case or Portfolio:
- Select a Case or Portfolio using the Case for Preview or Portfolio for Preview dropdowns located above the template list.
- Click the Action Menu (three dots) to the left of any template row to run it.
Template Settings & Configuration
Clicking directly on a template opens a slide-out panel where you can configure additional settings:
- Scope: Control where the template is available (e.g., showing for a Case, a Portfolio, or both).
- Parameters: Define custom parameters that can be referenced within the template during execution.
- Output Format: For Excel templates, choose your desired output file format—such as automatically converting the output to a PDF upon generation.
Template Details
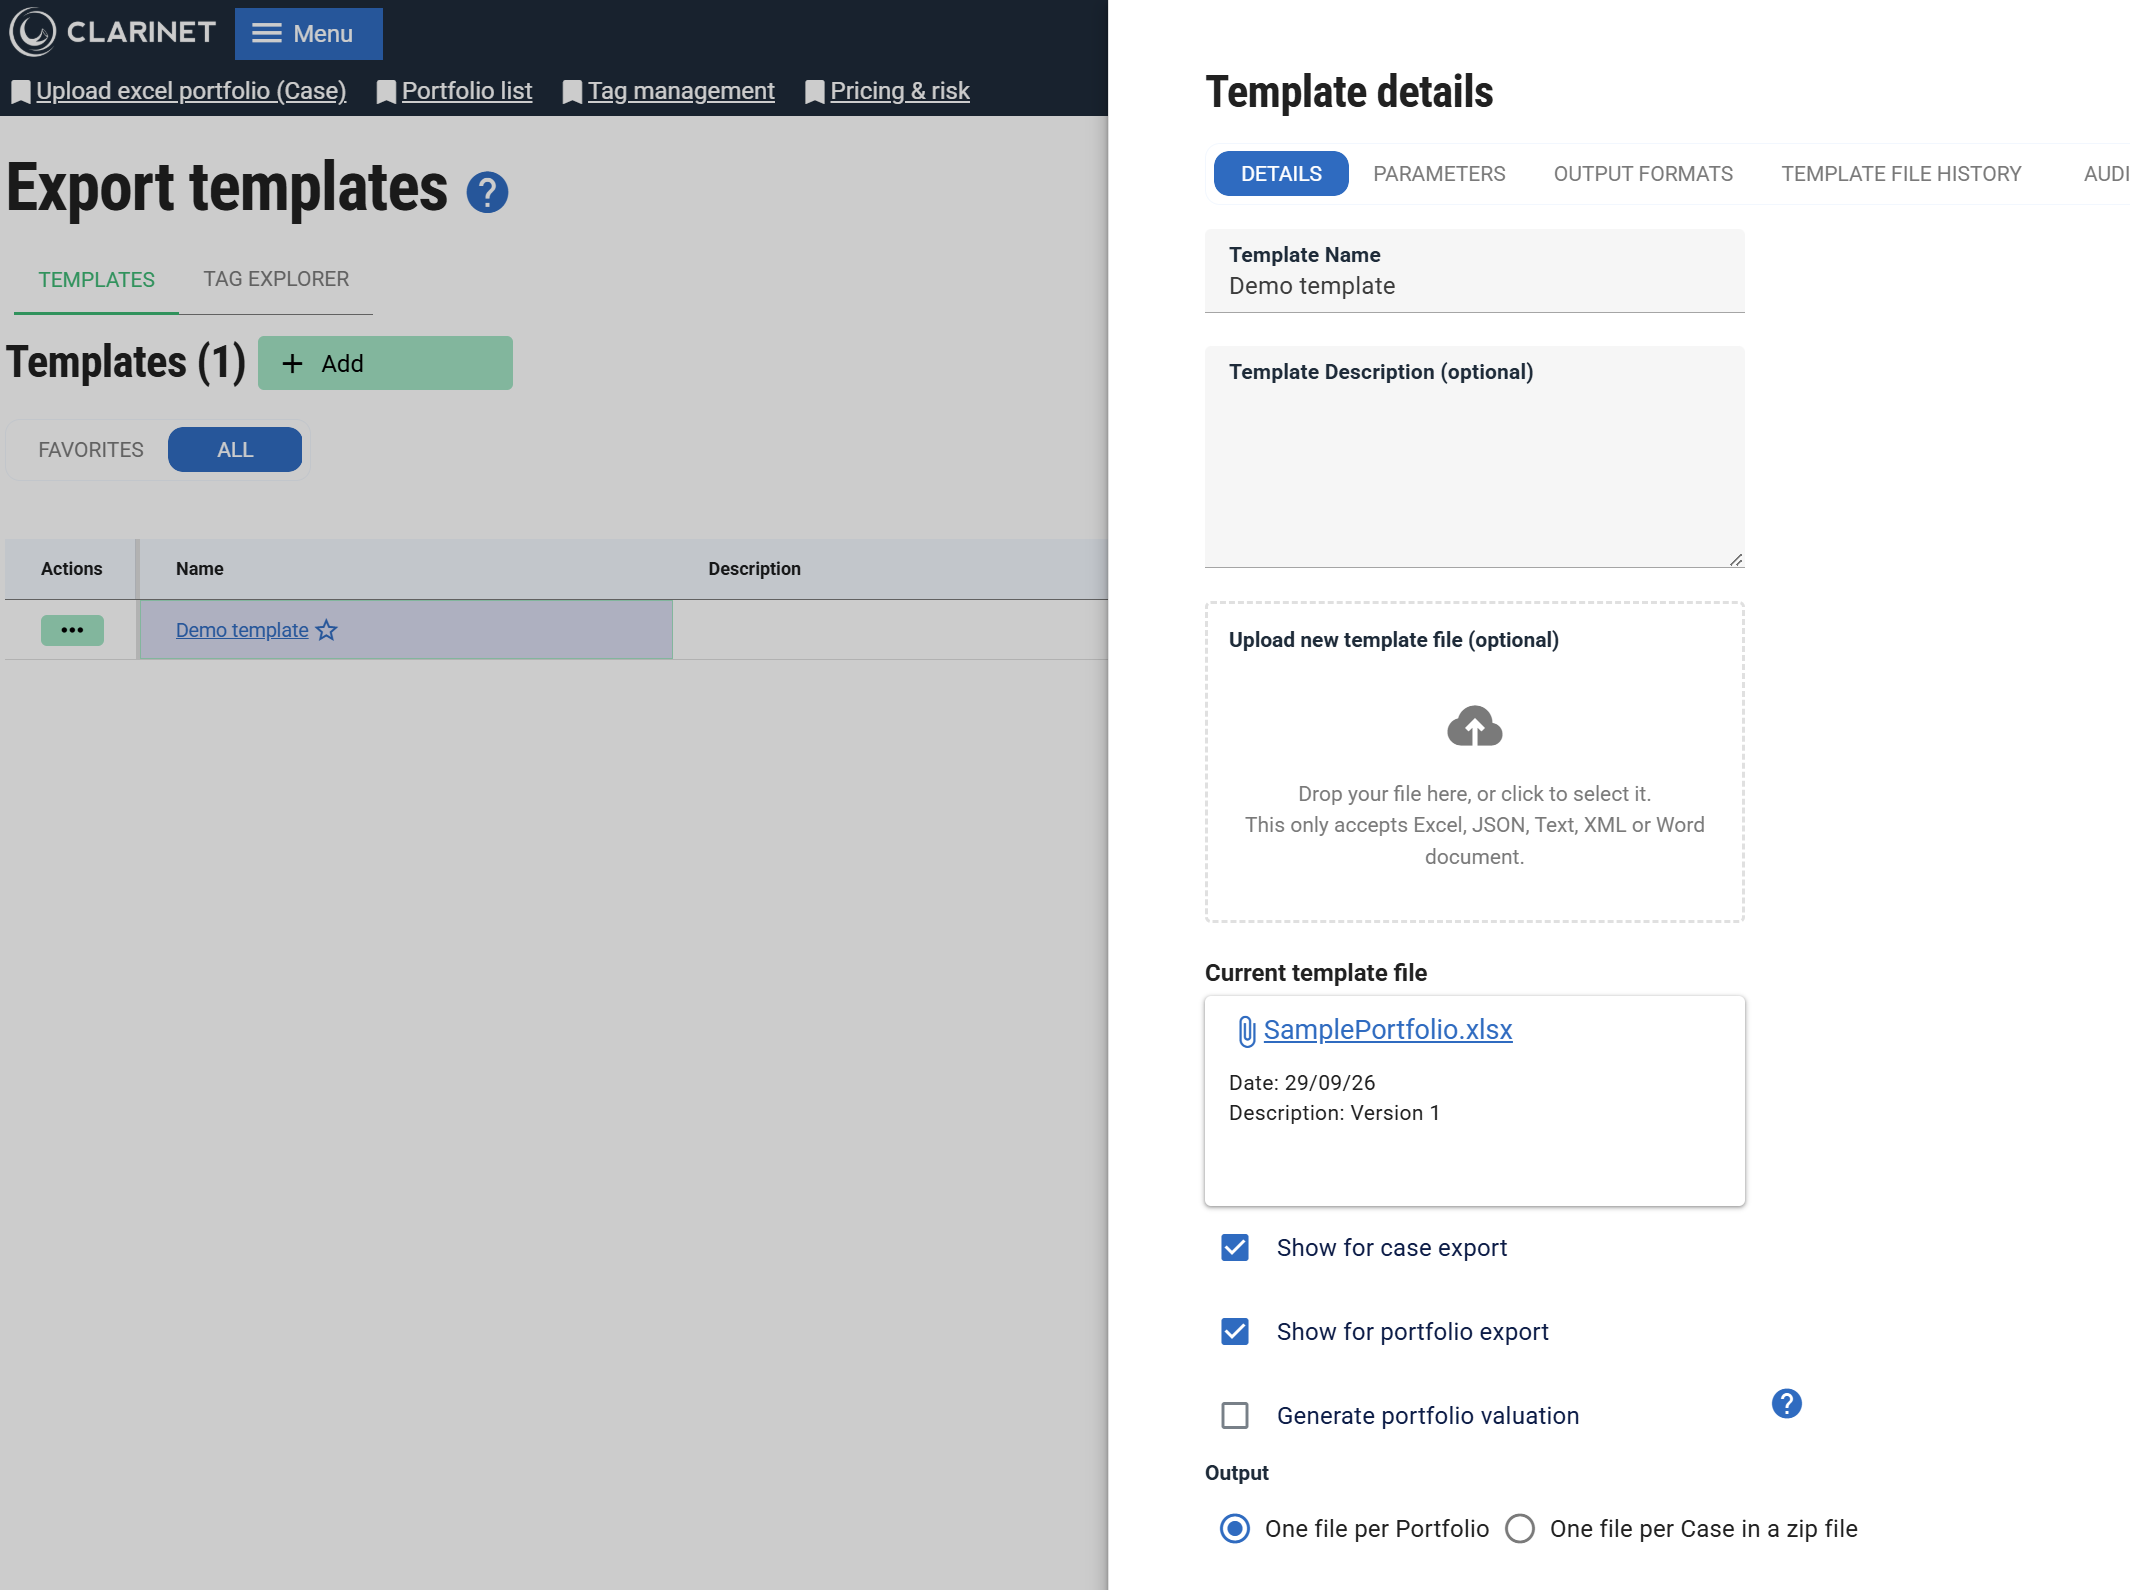
Clicking an individual template opens a slide-out panel containing setting tabs. The Details tab contains the primary configuration options and allows you to update the underlying template file.
General Settings
- Template Name The display name of the template as it appears in reporting dialogs across cases, portfolios, and search lists.
- Template Description Explains the template's purpose. This appears next to the template name in the main Settings → Export Template list.
- Upload new template file Drag and drop a new template file (
.xlsx,.docx, etc.) here to update an existing template with formatting or layout changes. - Current template file Downloads the current version of the template file currently loaded in ClariNet.
Visibility & Execution Controls
- Show for case export Controls whether this template is available when exporting an individual case.
- Show for portfolio export Controls whether this template is available when exporting in a multi-case context (such as a portfolio or search list).
- Generate portfolio valuation When enabled, ClariNet generates a portfolio valuation on the fly before running the template, making those results available during export. (Note: Only applicable in a portfolio context).
Output Options
- Output Mode - Controls how export files are generated when running against a set of cases:
- One file per Portfolio: Generates a single consolidated output file for all cases. The template receives a
$Casesvariable to loop over items and perform aggregate queries. - One file per Case in a zip file: Generates an individual output file for each case and bundles them into a single
.ziparchive. Each template instance operates strictly at the individual entity level.
- One file per Portfolio: Generates a single consolidated output file for all cases. The template receives a
Grouping & Naming (Zip Output Mode Only)
- Grouping Preset Appears when One file per Case is selected. It determines which entities within the selected cases are included and how they are presented to the template.
- Example: Selecting Surviving Insureds filters the selected cases down to living insured individuals before running the template for each one.
- Custom grouping expression Defines custom filtering criteria using valid export template expressions for advanced use cases where standard presets do not apply.
- Naming Preset Customizes the file naming convention inside the generated
.ziparchive. By default, files are named using the case reference, but you can select alternative fields (such as the insured's name). - Naming expression Defines custom naming conventions using valid export template expressions for advanced use cases where standard presets do not apply.
Parameters
You can define custom parameters for a template that prompt the user for input whenever the export is run (from a case list, portfolio, or individual case). The user's input is then passed directly into the template variables. Common examples include setting a filtering date range or defining a face amount threshold.
- Parameter Name The variable name passed into the template. For example, a parameter named
ReportDatecan be referenced inside the template using$ReportDate. - Label The field label shown to the user when prompting them for input prior to running the report.
- Parameter Type Controls the UI input control displayed to the user (e.g., a calendar picker for dates, a drop-down list for selections, or a text box for freeform entry).
- Description An optional explanation of the parameter's purpose. When populated, a tooltip icon appears next to the field that users can hover over for guidance
- Required Toggles whether the user must provide a value for this parameter before they can execute the export.
Output Formats
Output formats allow you to define the file types available to users when running a template.
By default, templates export in the format they were created in (e.g., an Excel template generates an Excel file).
Format Conversions: For Excel templates specifically, ClariNet can automatically convert the output to a PDF or an image if required. Other template types (such as Word documents or text files) do not currently support conversions.
ZIP Archive Option: For any output type, you can enable the ZIP option to bundle the resulting file inside a .zip archive.
Template File History
This tab presents the full history of the template, listing every version previously uploaded. You can download any past version or roll back to it if a mistake was made in later revisions.